HEAL Platform Documentation
1. The HEAL Platform
The HEAL Platform is a cloud-based and multifunctional web interface that provides a secure environment for discovery and analysis of NIH HEAL results and data. It is designed to serve users with a variety of objectives, backgrounds, and specialties.
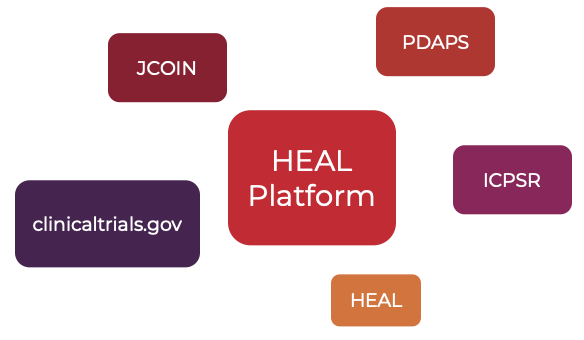
The HEAL Platform represents a dynamic Data Ecosystem that aggregates and hosts data from multiple resources to make data discovery and access easy for users.
The platform provides a way to search and query over study metadata and diverse data types, generated by different projects and organizations and stored across multiple secure repositories.
The HEAL platform also offers a secure and cost-effective cloud-computing environment for data analysis, empowering collaborative research and development of new analytical tools. New workflows and results of analyses can be shared with the HEAL community to enable collaborative, high-impact publications that address the opioid crisis.
The HEAL Platform is powered by the open-source software “Gen3” . Gen3 was created by and is actively developed at the University of Chicago’s Center for Translational Data Science (CTDS) with the aim of creating interoperable cloud-based data resources for the scientific research community.
Powered by

Watch the introduction video to the HEAL Platform
below
2. Types of hosted Data
The HEAL Platform provides secure access to data that is the product of opioid research and will be the driving engine for new discovery.
On the highest level, the data hosted on the HEAL Platform range from study metadata that describe available datasets at a high-level to subject-level data. The types of data represented are diverse and include scientific research across multiple disciplines, as well as studies related to policy making and community service leadership. For example, researchers can use this single platform to find data ranging from clinical patient care data and public records to “omics” data files and associated sample collection and processing data.
The HEAL platform aims to make data more accessible by following the "FAIR" principles:
Findable
- Researchers are provided an intuitive interface to search over metadata for HEAL studies and related datasets.
- Each study and dataset will be assigned a unique, persistent identifier.
Accessible
- Authenticated users can request and receive access to controlled-access data by data providers.
- Metadata can be accessed via an open API.
Interoperable
- Standard metadata vocabularies facilitate discovery and joint analysis of HEAL and related datasets. Data can
- Data can be easily exported to various workspaces for analysis using a variety of software tools.
Reusable
- Data can be easily reused to facilitate reproducibility of results, development and sharing of new tools, and collaboration between investigators.
3. Data Management and Repositories
As part of the NIH HEAL Initiative, the HEAL Platform securely exposes data stored on multiple HEAL-approved FAIR repositories, i.e. data libraries or archives. Thus, the aim of the platform is to provide an easy way to connect different repositories on one single location.
FAIR data repositories are traditionally a part of a larger institution established for research, data archiving, and, to serve data users of that organization.
For more information from NIH, see https://heal.nih.gov/about/public-access-data.
Currently, the HEAL platform makes data available from the following FAIR Data Resources or Repositories:
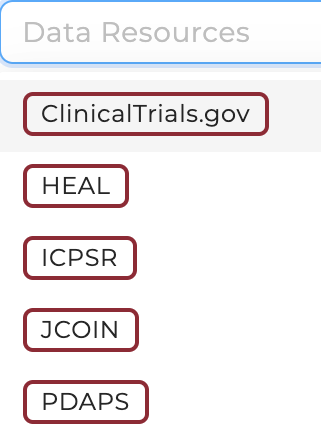
Studies from different Data Resources can be filtered and selected on the Discovery Page in the Study Characteristics section (top panel):
In the following, we list a short summary of datasets shared from each repository.
a) HEAL
At this time, the HEAL Platform shares metadata of 565 studies from https://heal.nih.gov/funding/awarded (status Feb 2021) under the general tag "HEAL". As more data become available to the public, the metadata and datasets will be distributed to different FAIR repositories.
b) Clinical Trials
ClinicalTrials.gov is a Web-based resource that provides patients, their family members, health care professionals, researchers, and the public with easy access to information on publicly and privately supported clinical studies on a wide range of diseases and conditions. For more information, please click here.
Currently, the HEAL platform shares 25 studies from the Clinical Trials repository.
- Innovatively Increasing PCP Prescribing of Buprenorphine: Measurement Based Care and Integrated Electronic Solution
- Feasibility of Deep Brain Stimulation as a Novel Treatment for Refractory Opioid Use Disorder
- mHealth for Patient Self-Management of Opioid Use Disorder
- Optimal Treatment of Veterans With PTSD and Comorbid OUD
- Biased Opioid Agonists for Treatment of Opioid Withdrawal in OUD
- Opioid Use Disorder Treatment Linkage at Sexual Health Clinics Using Buprenorphine
- Coordinating Opioid Use Treatment Through Medical Management With Infection Treatment (Project COMMIT)
- Preventing OUD in Justice-Involved Youth
- FNOS in HIV Subjects
- Clinical Decision Support to Implement ED-initiated Buprenorphine for OUD
- Cognitive Function and Pain Threshold in People Who Are Methadone Maintained
- SafetyNet Program for Opioid Use Disorder (OUD)
- Computerized Chemosensory-Based Orbitofrontal Cortex (CBOT) for Opioid Use Disorder
- Clinical Decision Support for Opioid Use Disorders in Medical Settings (COMPUTE 2.0)
- Treatment of Restless Legs Symptoms With Pramipexole to Improve the Outcomes of Protracted Opioid Withdrawal in OUD
- Quantitative Sensory Psychophysical Correlates of Pain in Pregnant Women With OUD
- The Whole Health Study: Collaborative Care for OUD and Mental Health Conditions
- Clinical Decision Support for Opioid Use Disorders in Medical Settings: Usability Testing in an EMR
- CoMBAT Opioid Use Disorder
- A Brief Negotiation Interview Chatbot to Improve Buprenorphine Engagement Among Justice-Involved Individuals
- PRimary Care Opioid Use Disorders Treatment (PROUD) Trial
- Exablate for LIFU Neuromodulation in Patients With Opioid Use Disorder (OUD)
- Treatment of Pregnant Women With OUD
- Suicide Prediction and Prevention for People at Risk for Opioid Use Disorder: Supplement to COMPUTE 2.0
- Prevention of OUD: The HOME Project (Housing, Opportunities, Motivation and Engagement)
c) Inter-university Consortium for Political and Social Research (ICPSR)
ICPSR is a data repository that in itself is an international consortium of more than 750 academic institutions and research organizations. ICPSR maintains a data archive of more than 250,000 files of research, and hosts many specialized collections. For more information, please click here.
Currently, the HEAL platform shares 8 studies from the ICPSR repository.
- National Mental Health Services Survey (N-MHSS), 2010. N-MHSS is the only source of national- and state-level data on the mental health services delivery system reported by both publicly and privately operated specialty mental health treatment facilities.
- National Survey of Substance Abuse Treatment Services (N-SSATS), 2004. N-SSATS is an annual census of public and private substance use treatment facilities.
- Treatment Episode Data Set -- Discharges (TEDS-D) -- Concatenated, 2006 to 2011. Recorded discharges during substance abuse treatment.
- Monitoring the Future: A Continuing Study of American Youth (12th-Grade Survey), 2019
- Monitoring the Future: A Continuing Study of American Youth (8th- and 10th-Grade Surveys), 2019
- Army Study to Assess Risk and Resilience in Servicemembers (STARRS)
- Michigan Automated Prescription System (MAPS), January 2014-March 2021
- Michigan Automated Prescription System (MAPS), May 2020 Data
d) Justice Community Opioid Innovation Network (JCOIN)
The NIH HEAL Initiative will support the Justice Community Opioid Innovation Network (JCOIN) to study approaches to increase high-quality care for people with opioid misuse and Opioid Use Disorder in justice settings. JCOIN will test strategies to expand effective treatment and care in partnership with local and state justice systems and community-based treatment providers. For more information, please click here.
Currently, the HEAL platform shares 2 studies from the JCOIN repository.
- Methodology and Advanced Analytics Resource Center - AmeriSpeak Opioid Stigma Surveys. Repeated cross-sectional survey tracking stigma and public attitudes towards opioid use disorder over time in a nationally representative sample.
- Methodology and Advanced Analytics Resource Center - The Opioid Environment Policy Scan. The Opioid Environment Policy Scan provides access to data at multiple spatial scales to help characterize the multi-dimensional risk environment impacting opioid use in justice populations across the United States.
e) Prescription Drug Abuse Policy System (PDAPS)
PDAPS was created with funding from the National Institute on Drug Abuse to track key state laws related to prescription drug abuse. PDAPS is a source of rigorous legal data for researchers and detailed policy information for the public. For more information, please click here.
Currently, the HEAL platform shares 1 study from the Prescription Drug Abuse Policy System (PDAPS) repository.
- Naloxone Overdose Prevention Laws. Tracking key state laws related to prescription drug abuse.
4. How to get started
a) HEAL Platform Overview
Click on an icon to jump to the section
b) Login Page
You will not need to log in in order to:
- Browse the study metadata on the Discovery Page
- follow along the pre-made tutorial notebooks in the “Example Analysis” tab
Click here to see all open-access studies.
You will need to log in and obtain authorization (access) in order to
- access studies with controlled data
- perform analyses in workspaces
- download data files and file manifests
- run interactive tutorial notebooks in workspaces
Start by visiting the login page (https://healdata.org/login).
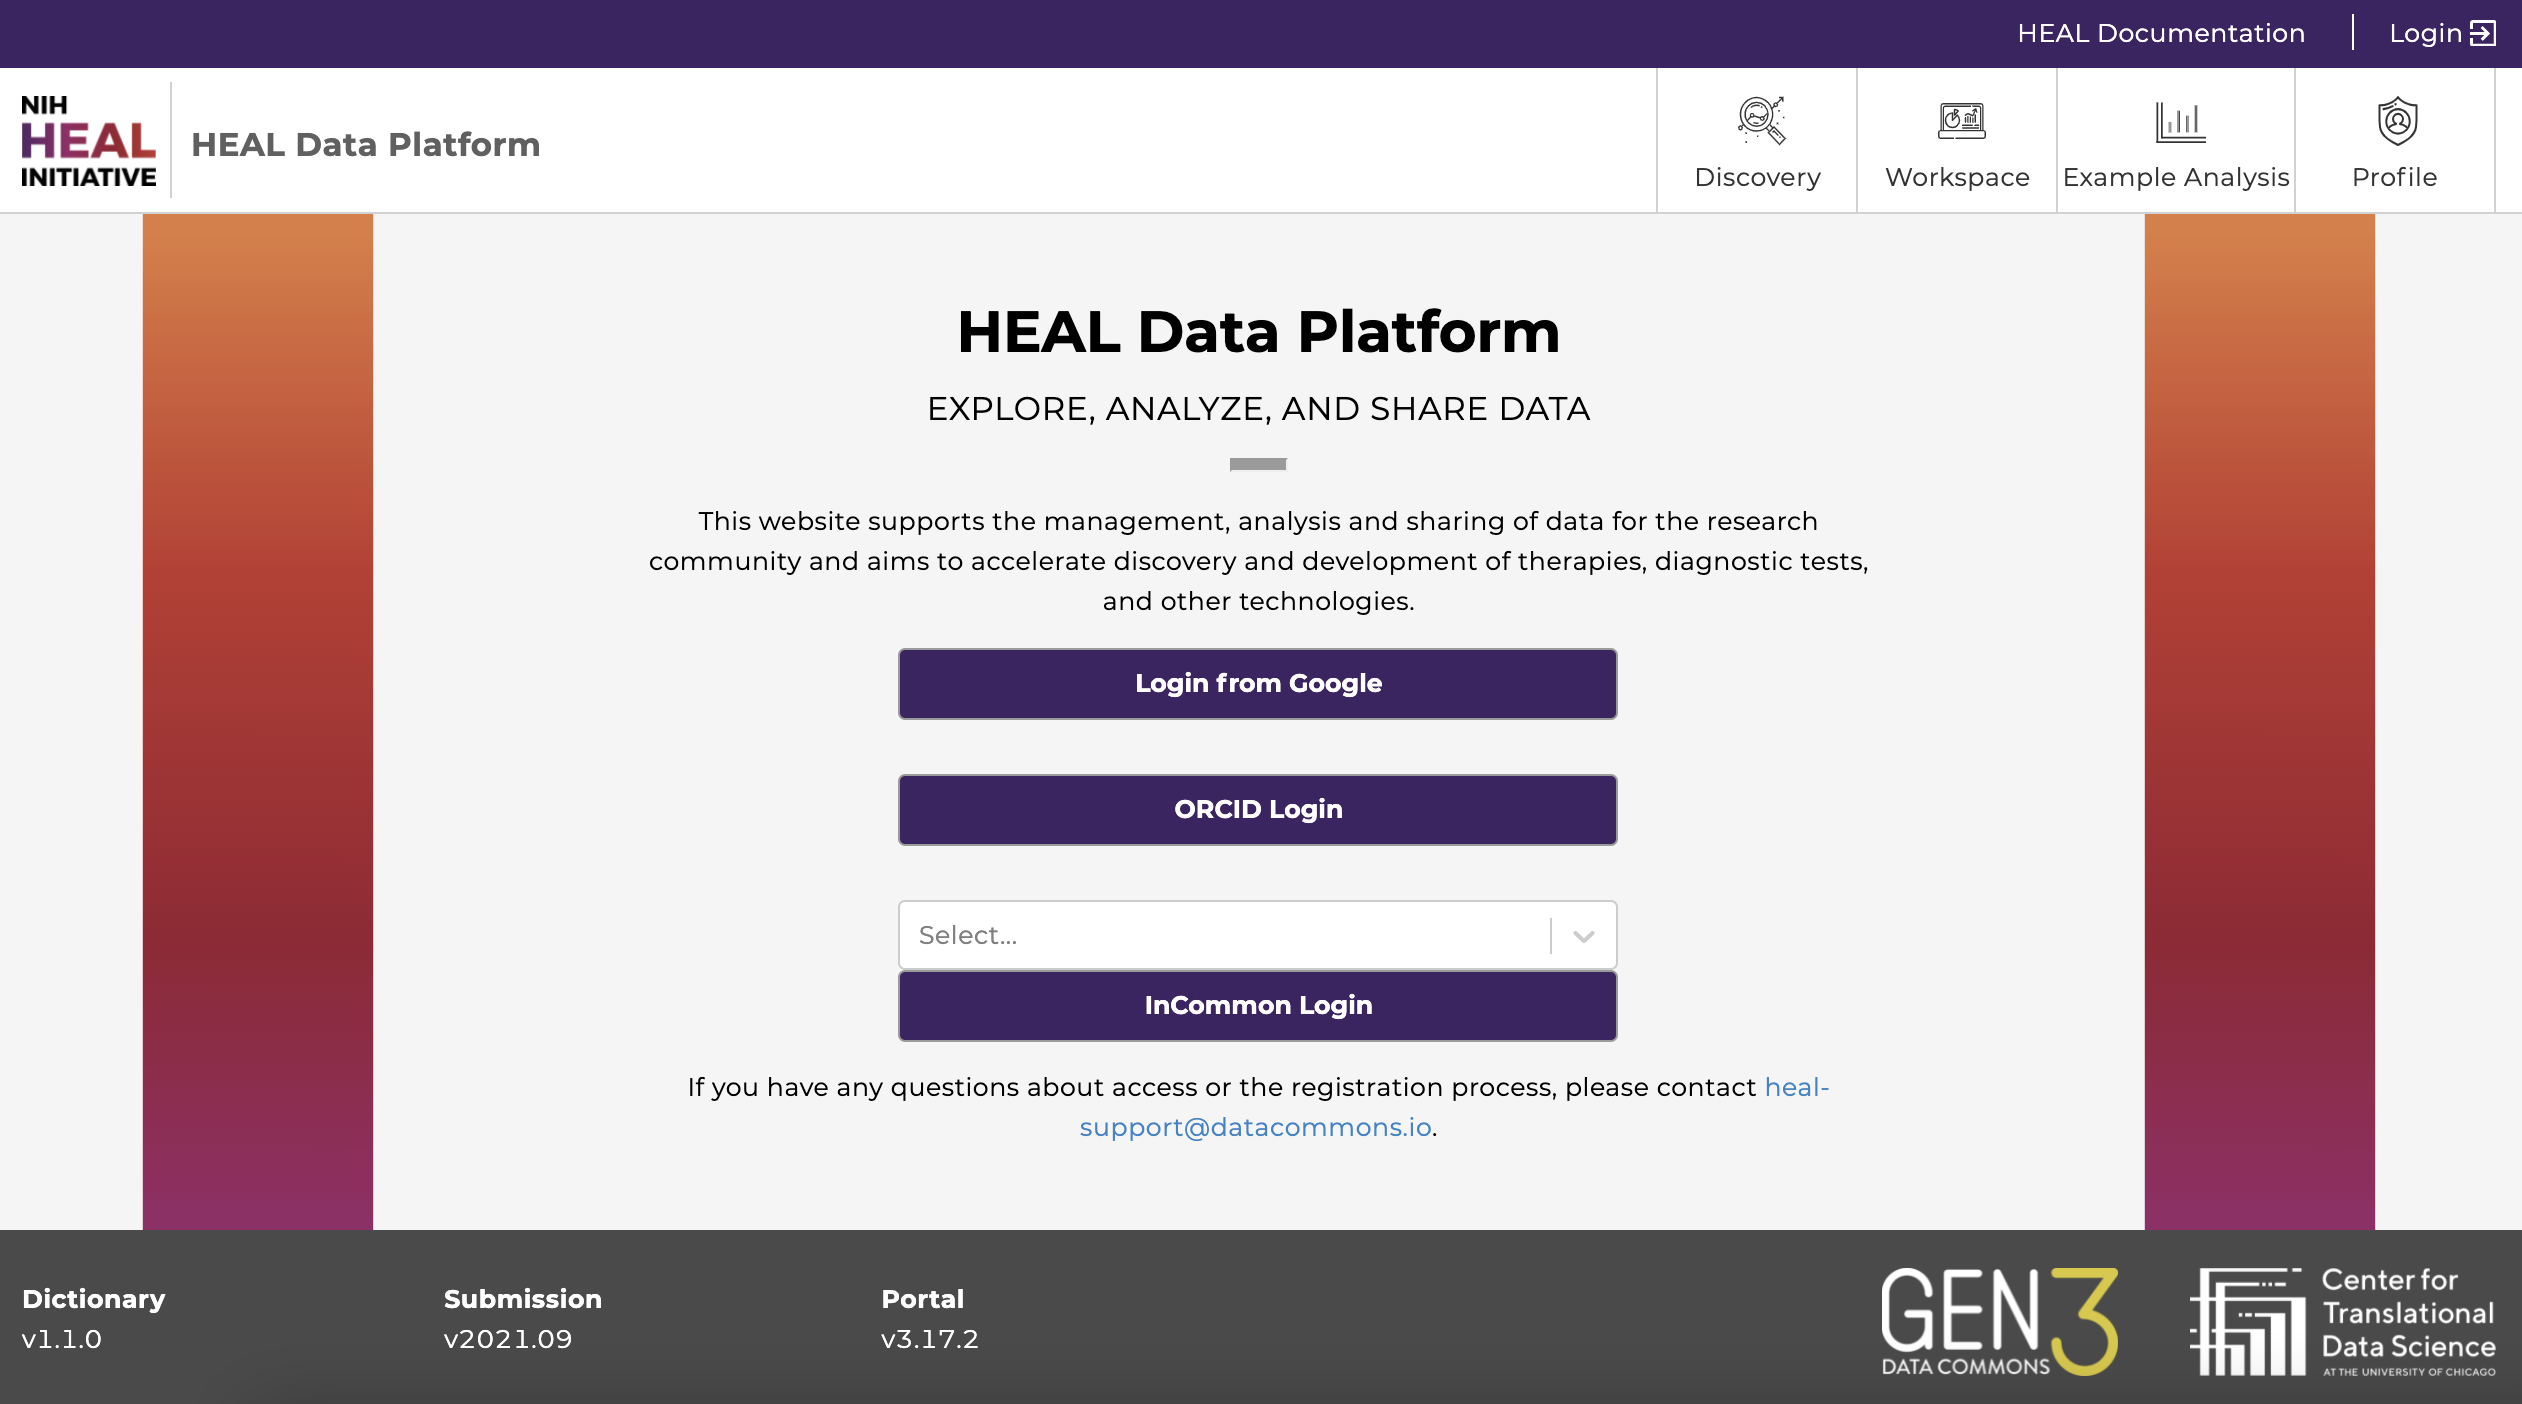
- Login from Google: You may login using any Google account credentials, or a G-suite enabled institutional email. This option may or may not be available depending on the institution or organization the user is associated with. Users should contact the IT support to verify if this option is available. For staff, students, and faculty of the University of Chicago, more information can be found here.
- ORCID Login: Users with an ORCID account can log in using their ORCID credentials.
- InCommon Login: Users can login with a participating institution that is federated by InCommon. Click on “Select...” to browse and choose the institution.
After successfully logging in, your username will appear in the upper right-hand corner of the page.
c) How to check and request access
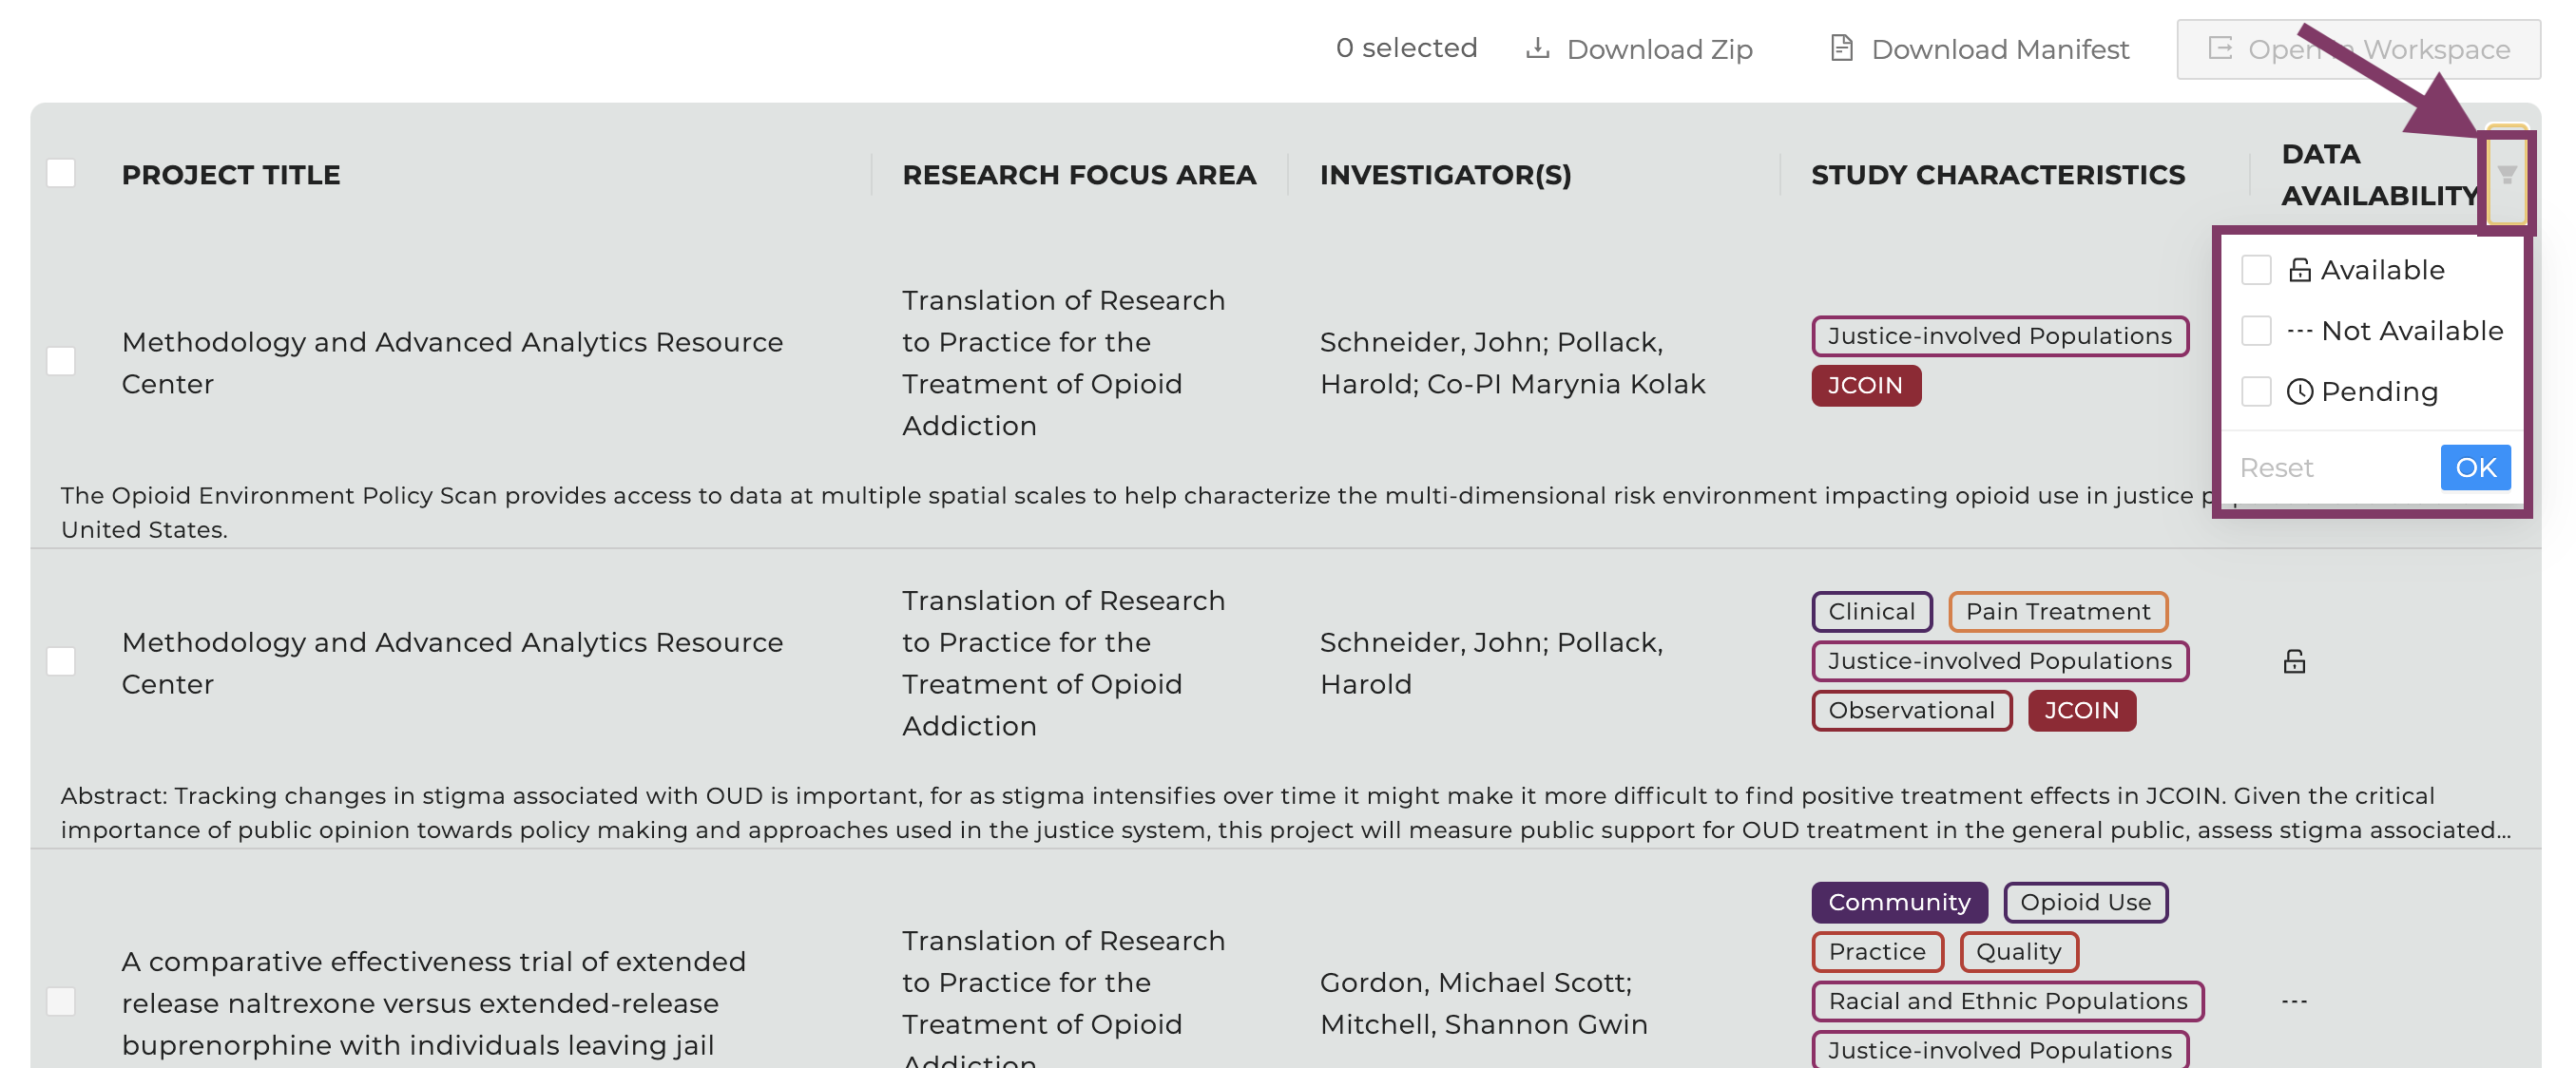
Users can find out to which projects they have access to by navigating to the Discovery Page and by selecting “Data Availability" - "Available" - ”OK” as shown below.
Access to individual Studies
You can check access by clicking on a study in the Discovery Page, as shown below:
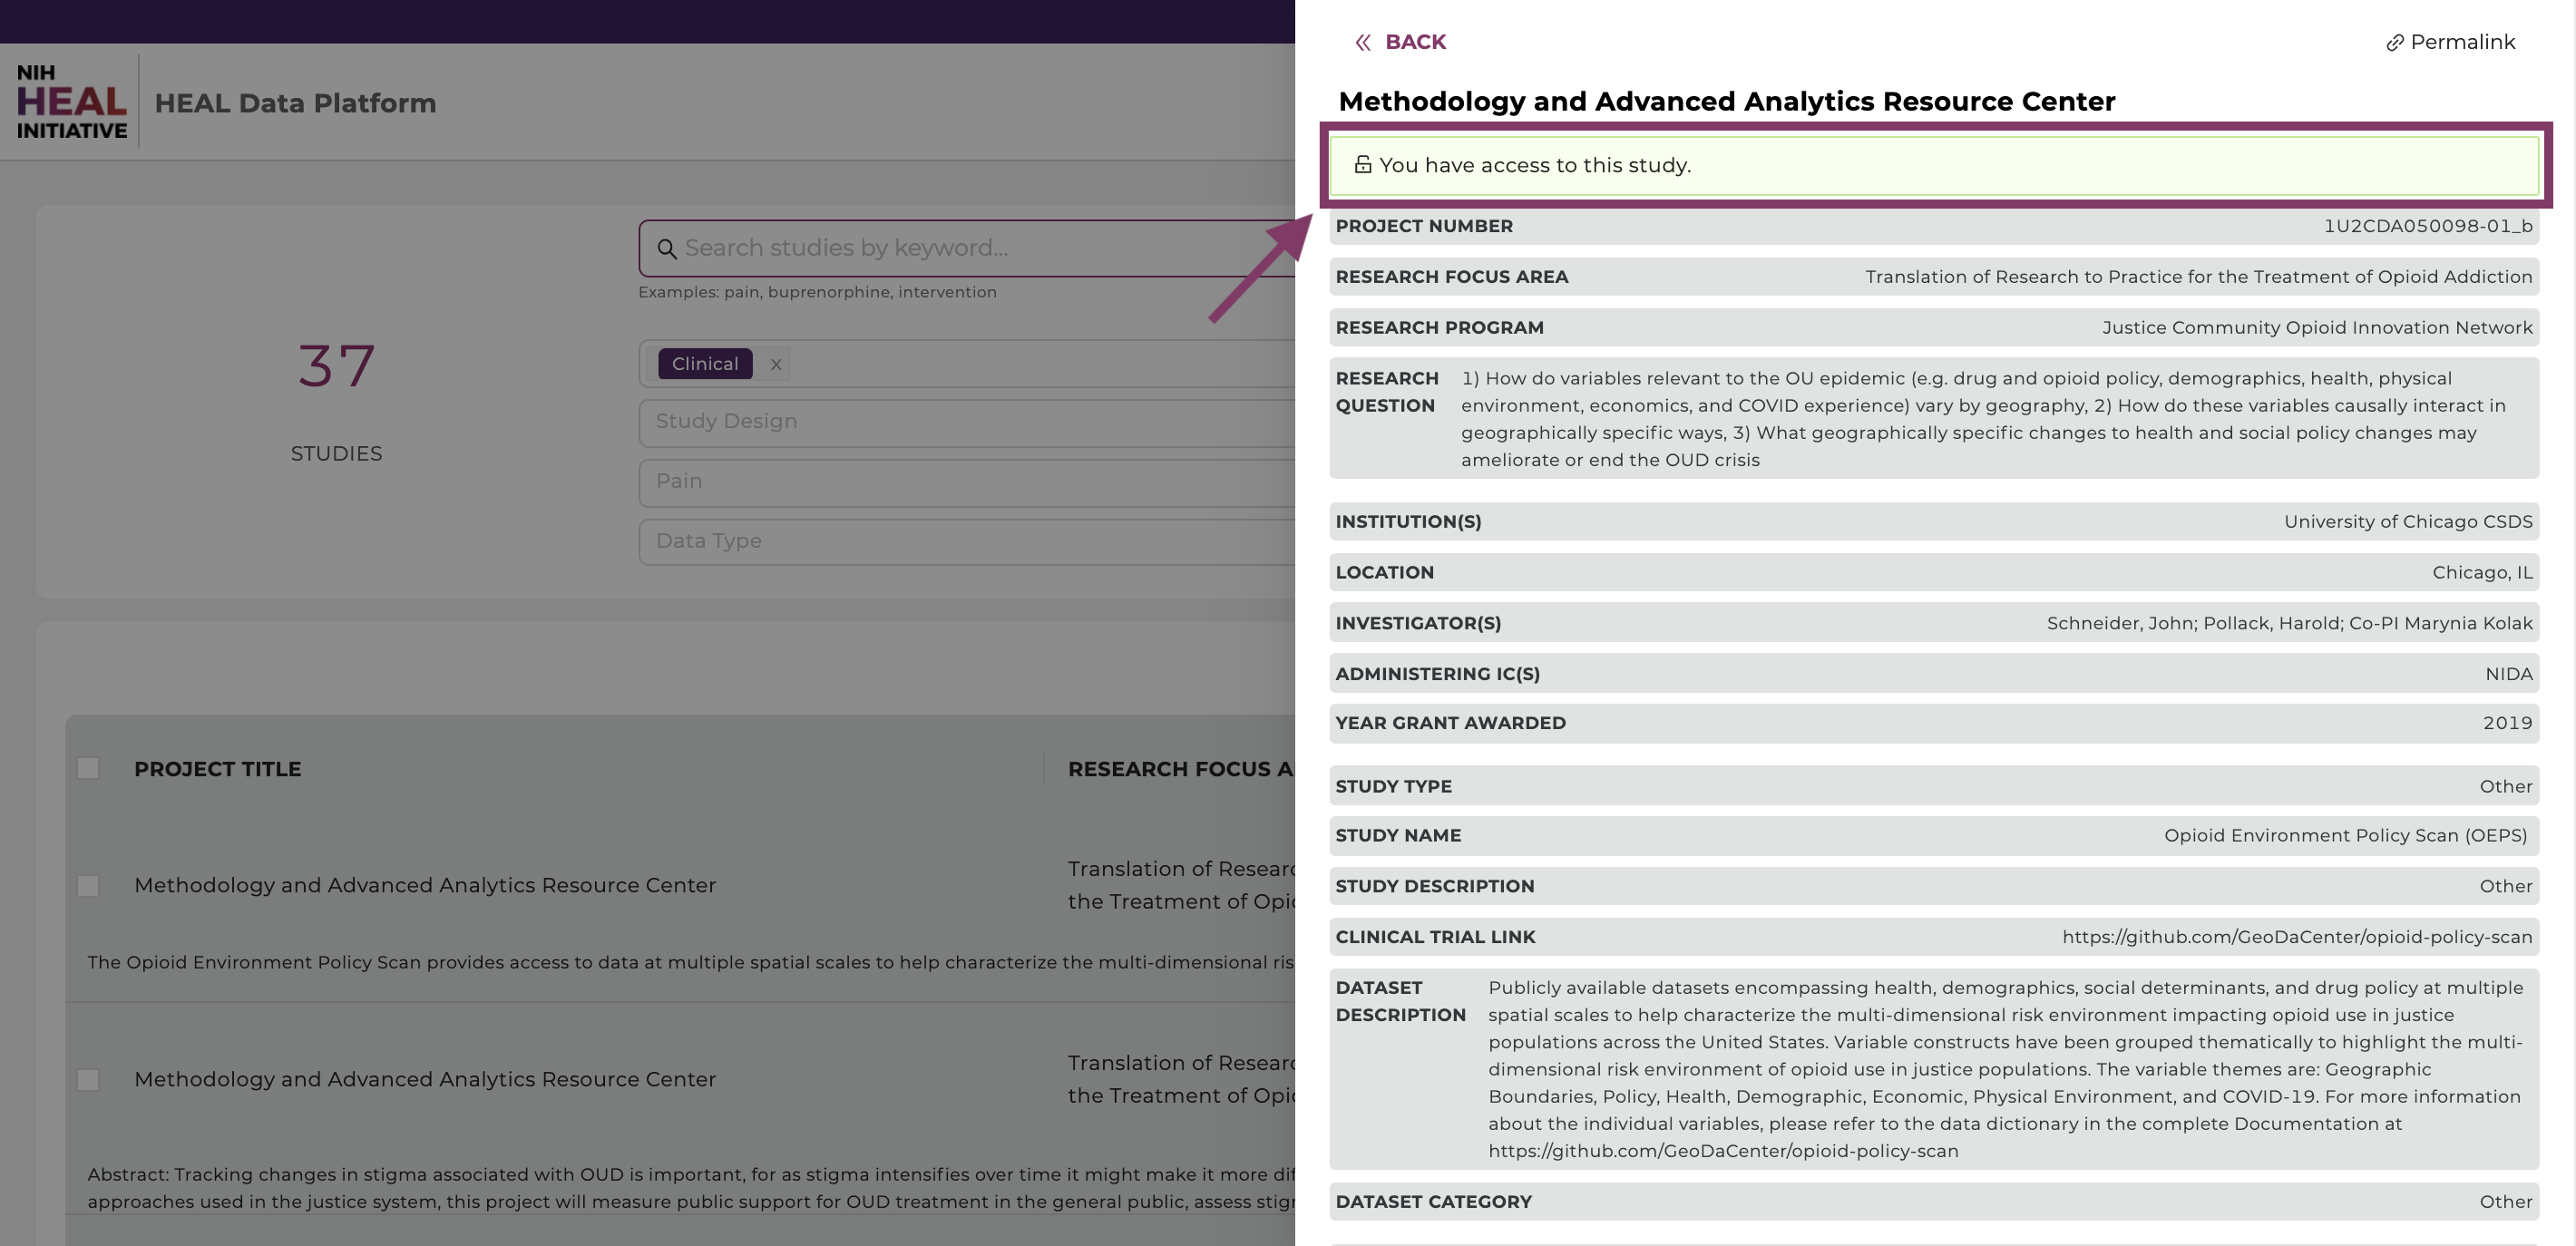
If you have access, a green box will show “You have access to this study”.

Current (open-access) studies
Current open-access studies will be shown when navigating to the Discovery Page.
Users can download and/or export open-access study files after logging in. Currently, the HEAL
Platform hosts the following studies. All are open-access except when noted.
Note, that different studies relate to different Data Resources.
| Project number | Study Name | Data Resource |
|---|---|---|
| 57b45d83d6c9e7e8693ccdfd | Naloxone Overdose Prevention Laws | PDAPS |
| 10.3886/ICPSR34945.v3 | National Mental Health Services Survey (N-MHSS) | ICPSR |
| 1U24AR076730-01 | A synthetic dataset from the Back Pain Consortium (BACPAC) Research Program Data Integration, Algorithm Development and Operations Management Center | HEAL |
| 10.3886/ICPSR04256.v5 | National Survey of Substance Abuse Treatment Services (N-SSATS) | ICPSR |
| cdcwonder | CDC Wide-ranging Online Data for Epidemiologic Research (CDC WONDER) Mortality Multiple Cause-of-Death Public Use Record | HEAL |
| 10.3886/ICPSR30122.v5 | Treatment Episode Data Set: Discharges (TEDS-D) | ICPSR |
| deaarcos1 | Drug Enforcement Administration Controlled Substances Tracking (DEA ARCOS) | HEAL |
|
a) 1U2CDA050098-01_a b) 1U2CDA050098-01_b |
JCOIN - Methodology and Advanced Analytics Resource Center: a) JCOIN 026: Amerispeak Brief Stigma Survey b) The Opioid Environment Policy Scan |
JCOIN |
Overview of access to Datasets and Studies
Users can visit the "Profile” page to view a list of studies they have access to under the “You have access to the following project(s)” section, as shown in the figure below.
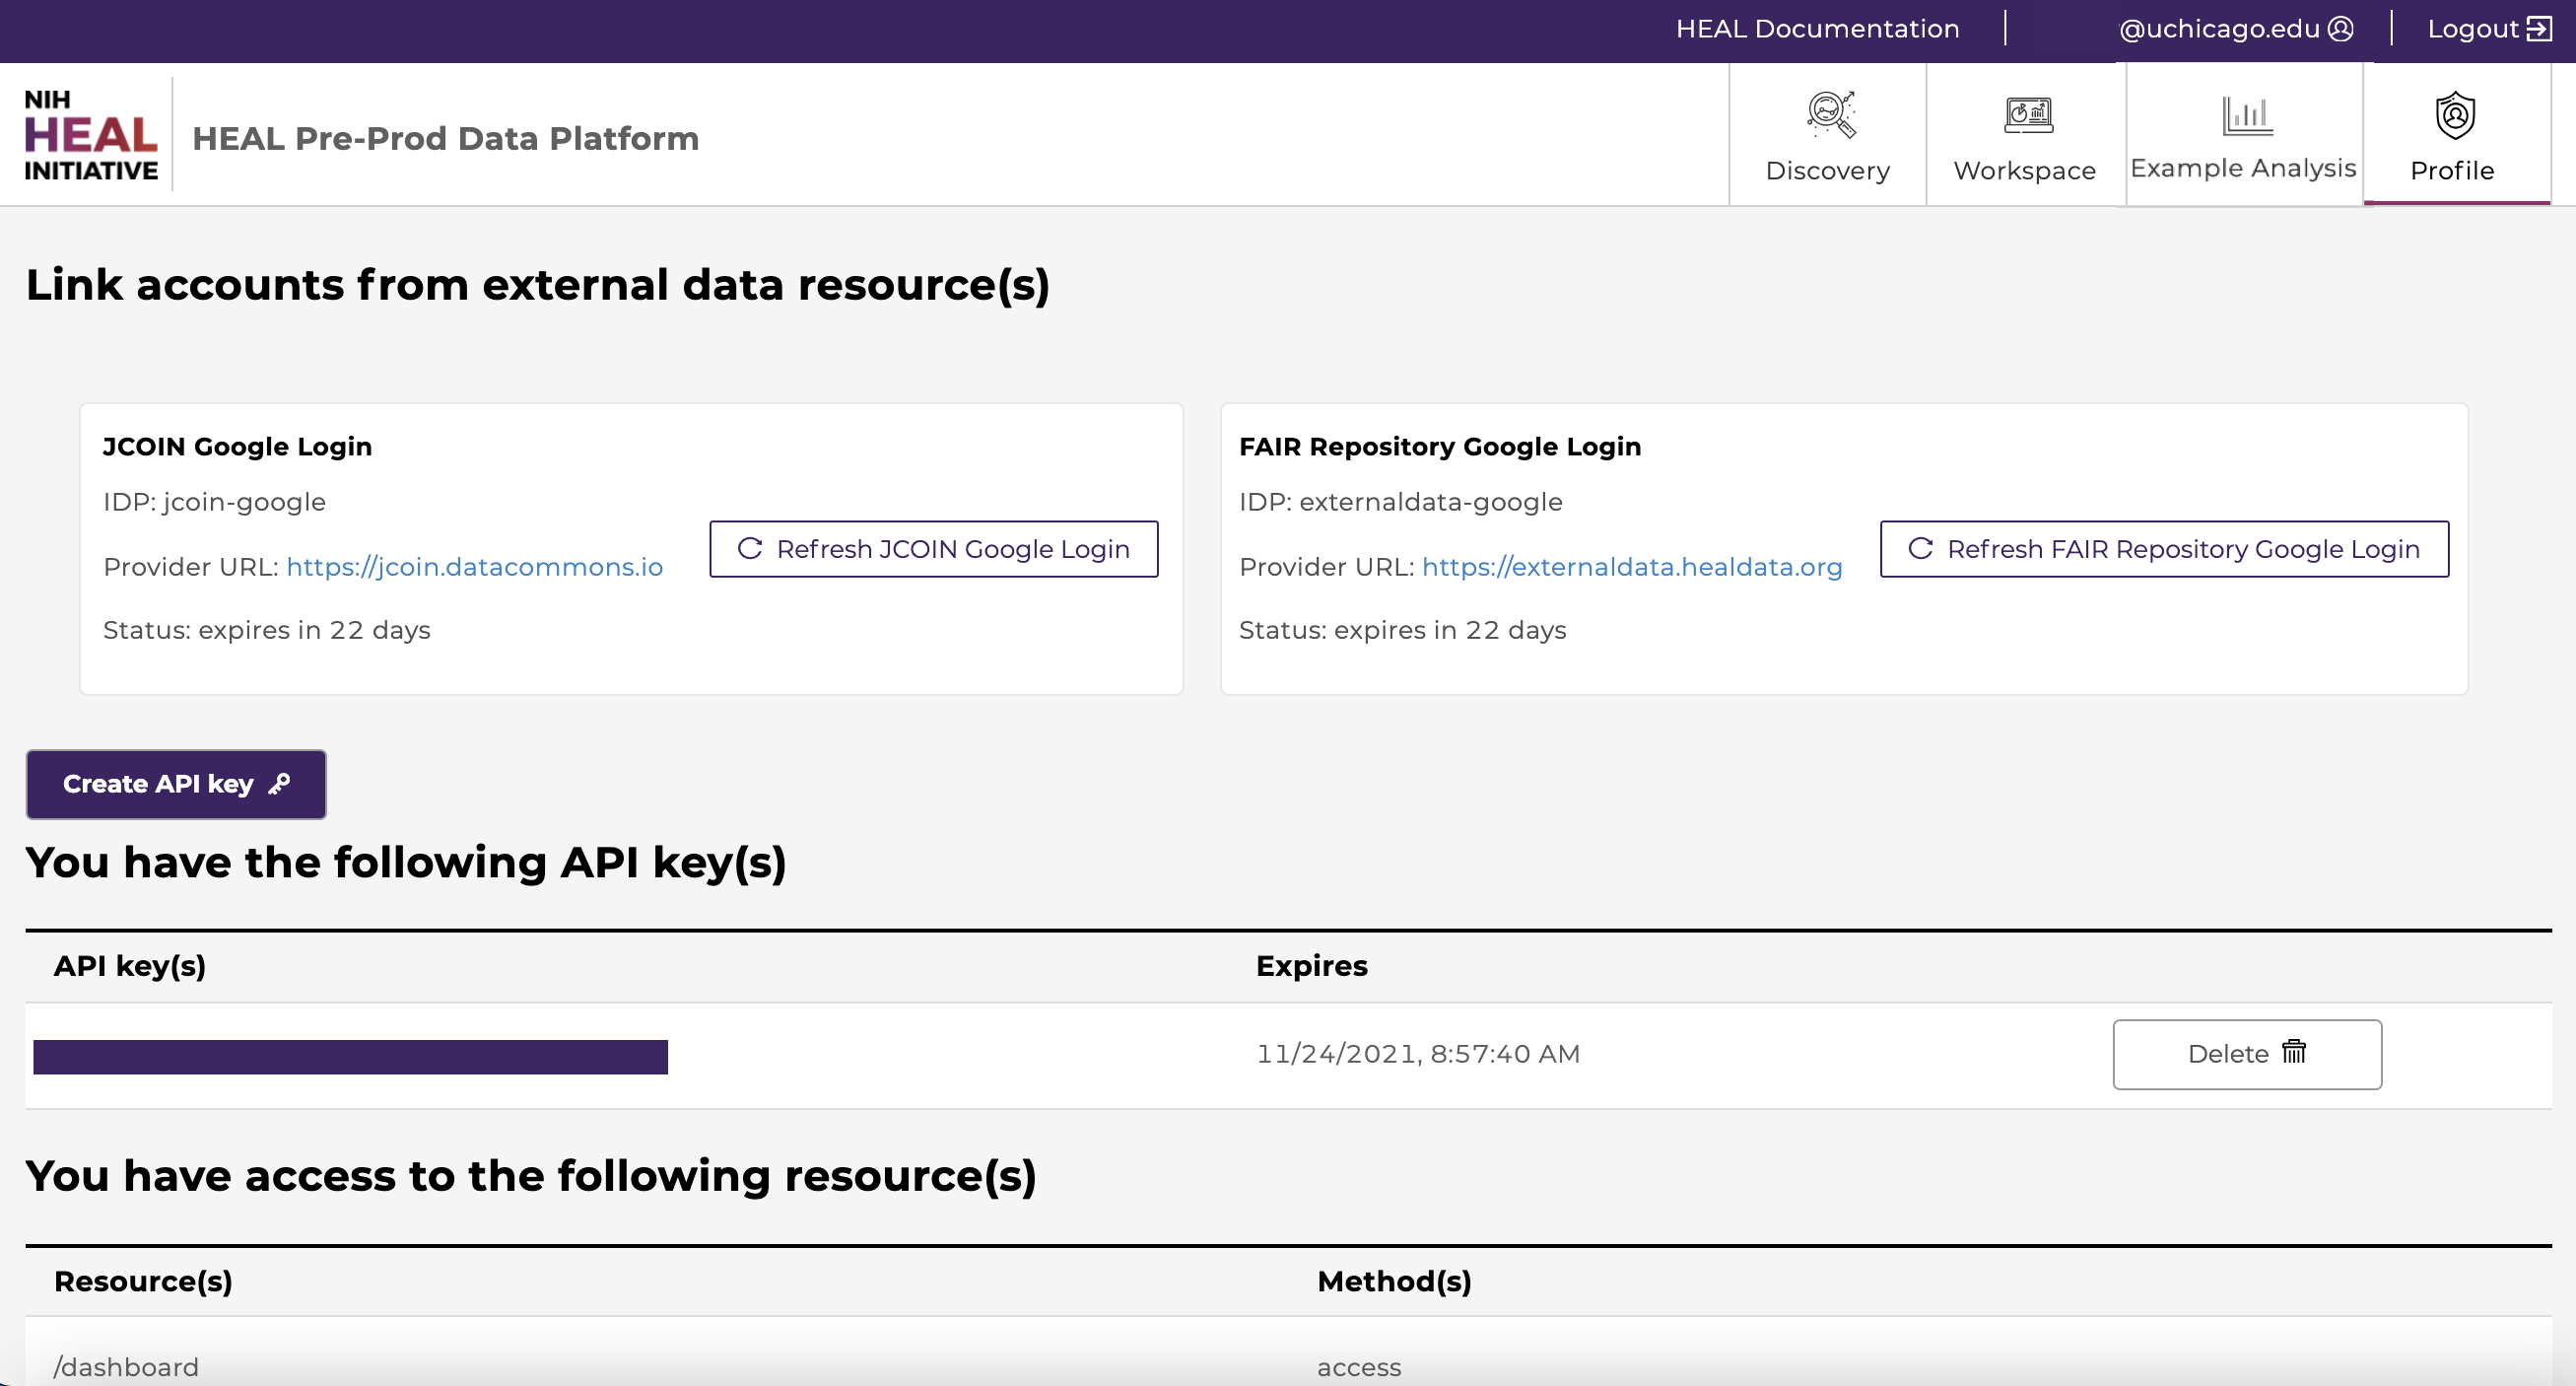
From here users can also view current API keys or create and download new keys. API keys are required for downloads which require use of the Gen3-client. More information in the chapter “Downloading Data Files”.

From here users can also view if they have access to projects or workspaces
- /dictionary_page: You have access to the data dictionary.
- /workspace: You have access to the workspace.
- /programs/open: You have access to open-access projects.
Linking access to FAIR enabled repositories
The HEAL Platform securely exposes data stored on multiple HEAL-approved FAIR repositories.
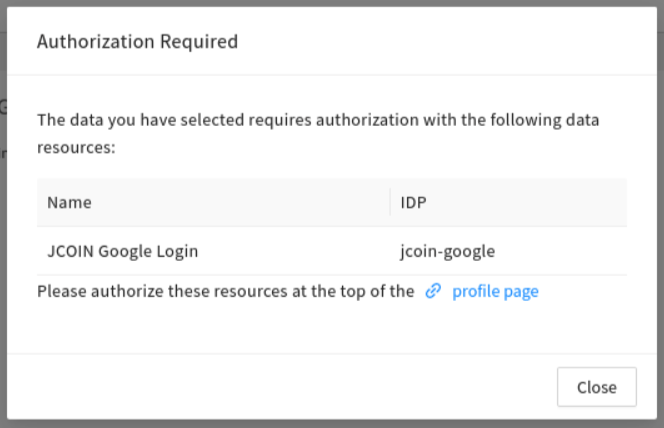
Users need to link their account to currently all FAIR repositories in order to:
- run Jupyter Notebooks that utilize data stored on various FAIR repositories.
- export data that is stored on FAIR repositories from the Discovery Page to the Workspaces.
- download data that is stored on FAIR repositories from the Discovery Page.
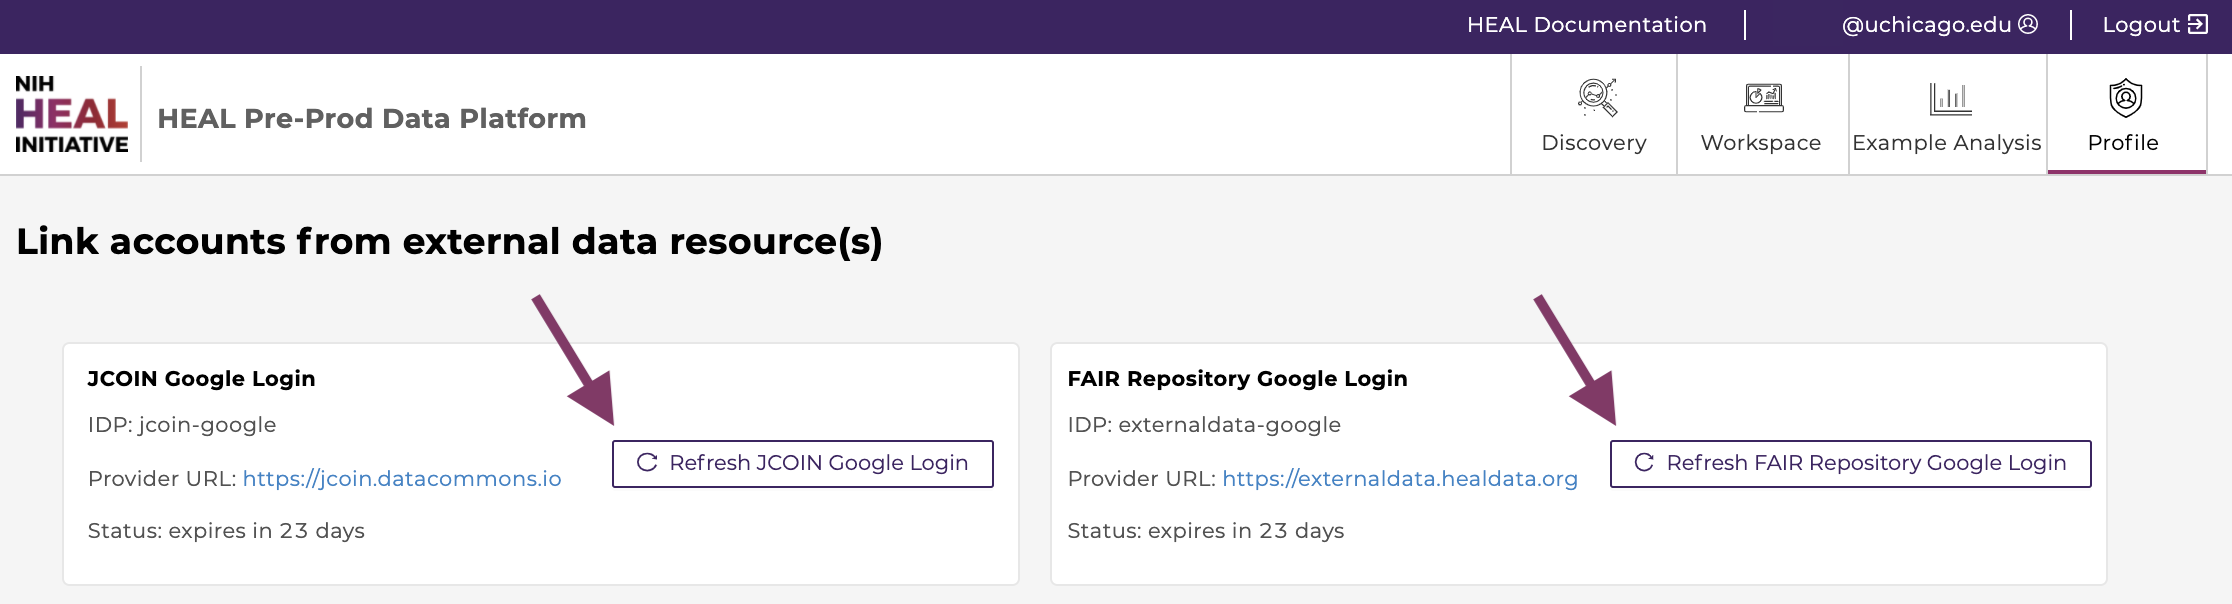
Access needs to be renewed after 30 days, as indicated after "Status: expires in [..] days".
As a reminder, users will be prompted with a banner on healdata.org/workspace and a pop-up window on healdata.org/discovery.

d) Discovery Page
The Discovery Page provides users a venue to search and find studies and datasets displayed in the HEAL Platform. Users can browse through the publicly accessible study-level metadata without requiring authorization.
Use text-based search, faceted search, and tags to rapidly and efficiently find relevant studies, discover new datasets across multiple resources, and easily export selected data files to the analysis workspace.
Search Features
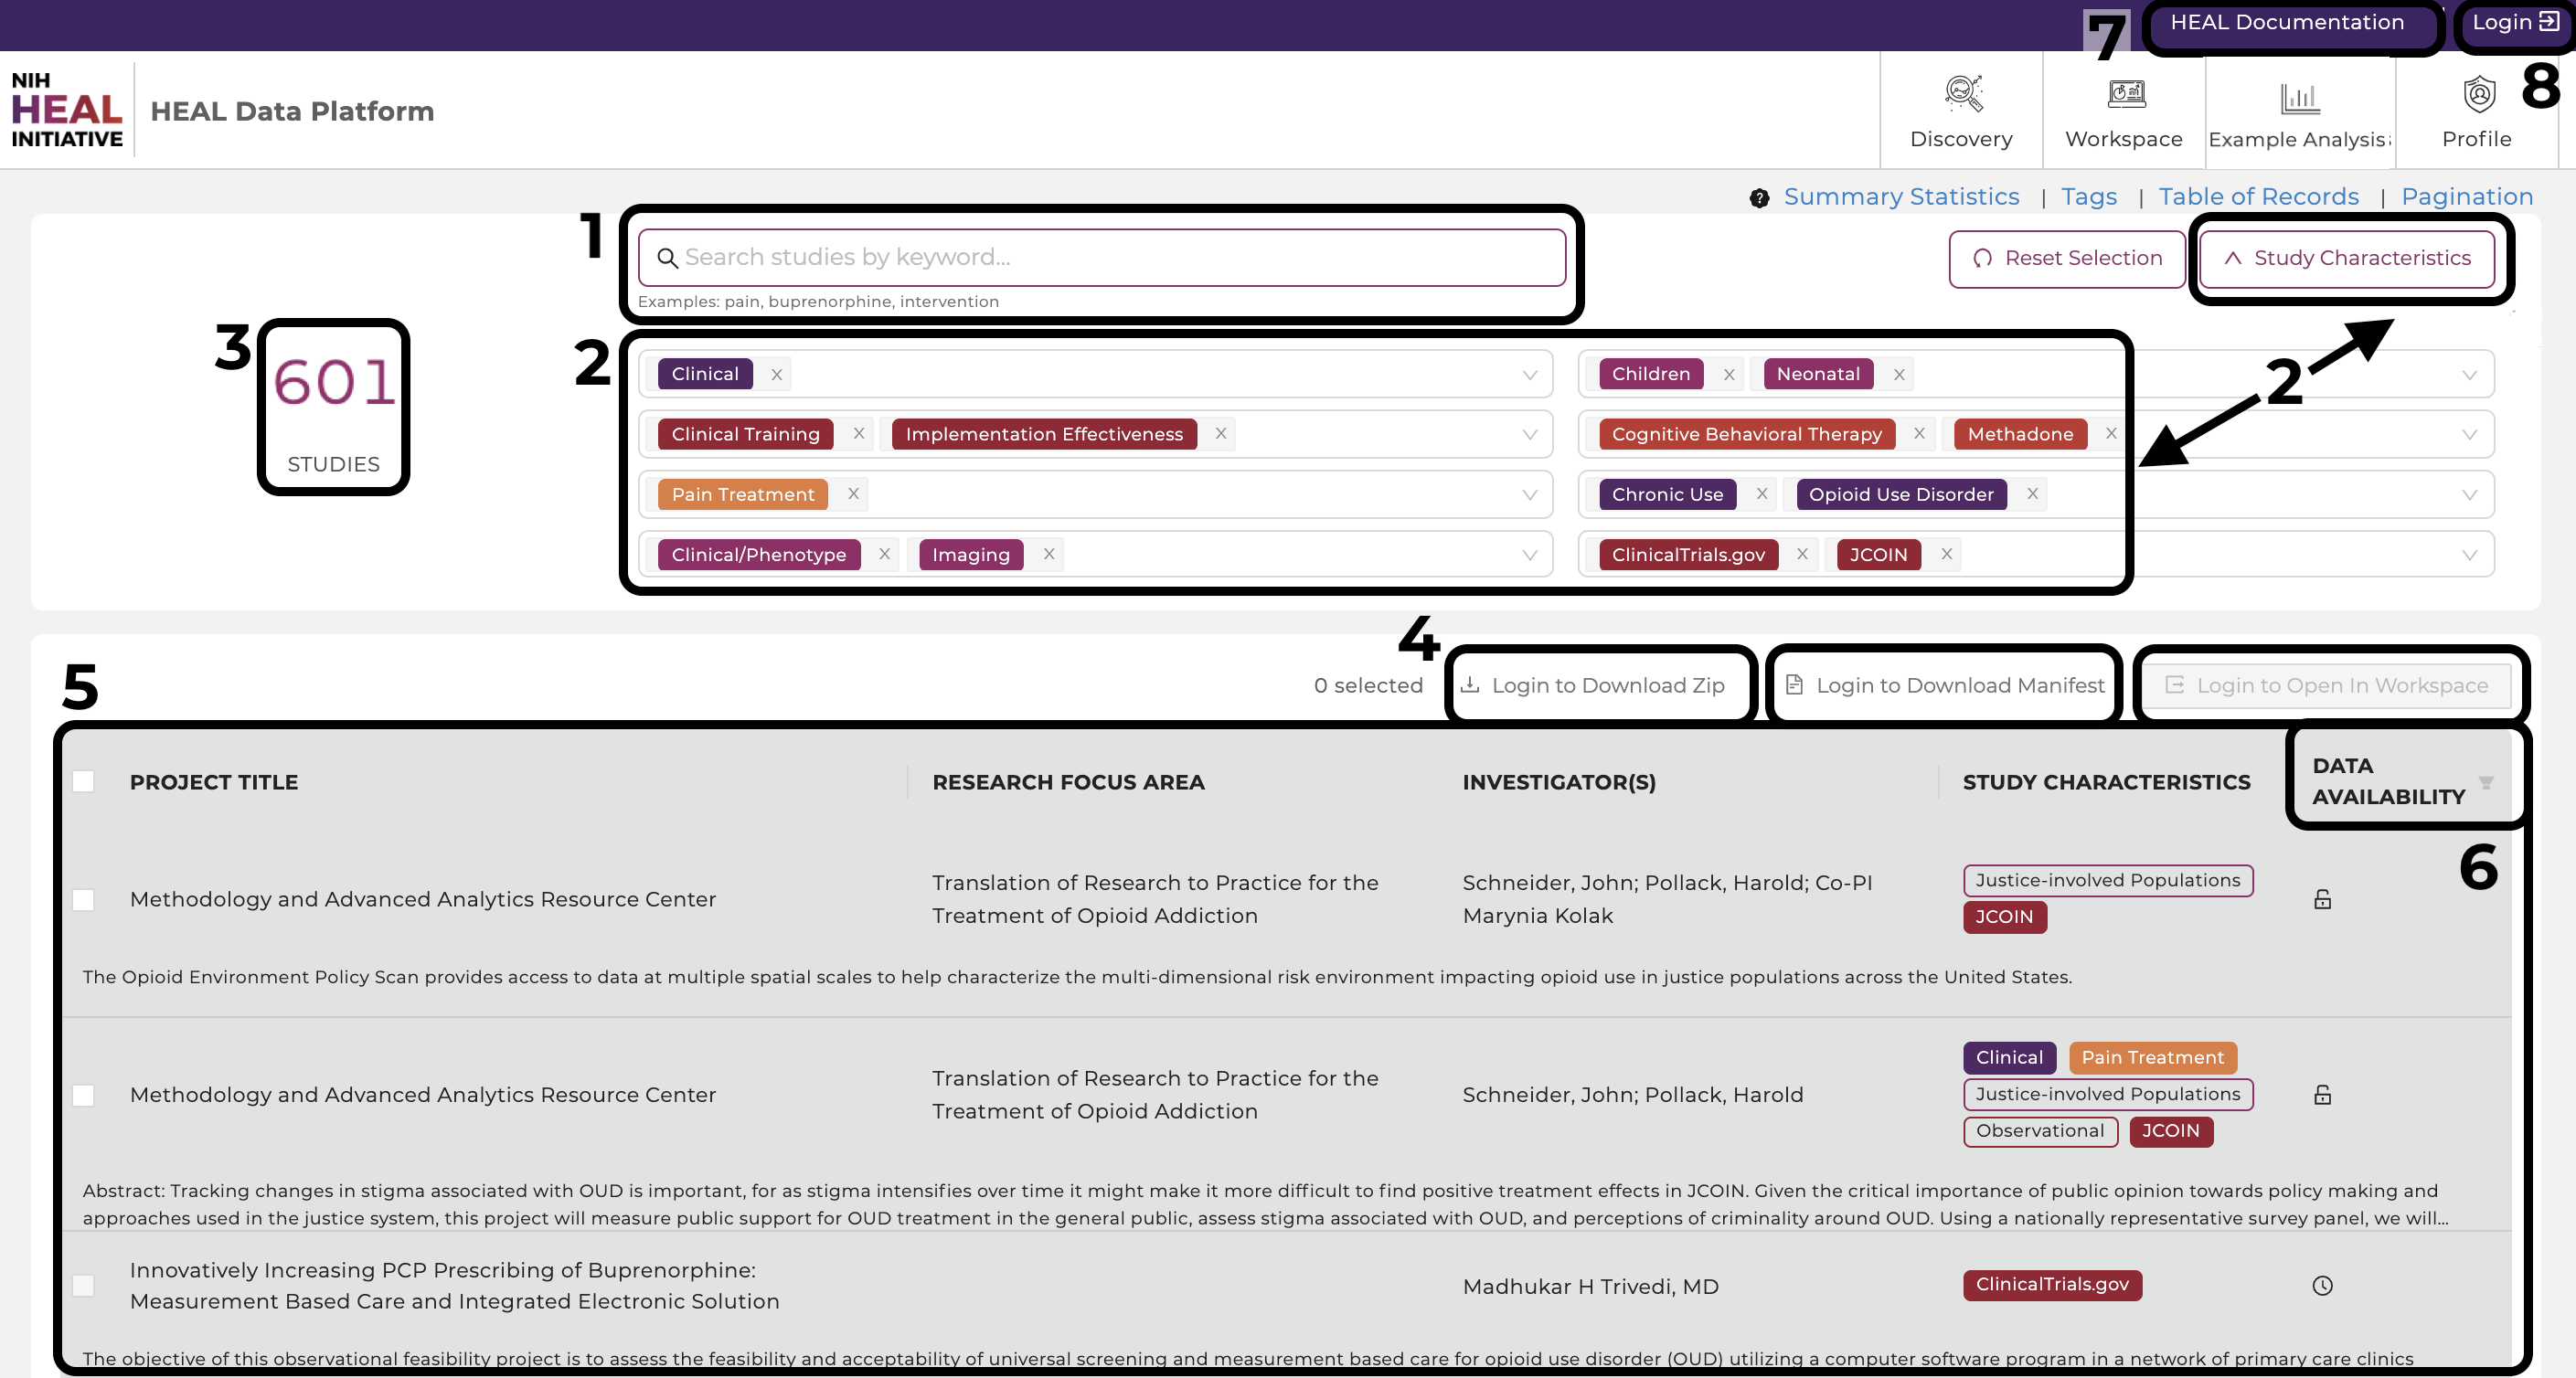
- Free Text Search. Finding studies is made easy using keywords in the free text-based search bar or using tags. The free-text search bar can be used to search for study title, investigator name, or any keyword that is mentioned in the metadata of the study. Type in any keyword mentioned in the metadata, except for what is stored as Tags in "Study Characteristics".
- Study Characteristics. Click "Study Characteristics" to expand the search options. Find a range of tags in eight categories (Study Setting, Study Design, Pain, Data Type, Subject Characteristics, Intervention/Treatment, Substance Use, Data Resources) to narrow down any search. Selecting multiple tags work in a "OR" logic. Click on "Reset Selection" to start a new search.
- The total number of studies. Shows the amount of studies the HEAL Platform is currently displaying.
- Export Options. Login first to leverage the export options. Select one or multiple studies and 1) download the attached data files, 2) download a file manifest (for data files whose sizes exceed 250 MB), or 3) export the metadata and data files to a secure cloud environment "Workspaces" to start your custom data analysis in Python, R, or STATA.
- Studies. This feature presents all current studies on the HEAL Platform. Click on any study to show useful information about the study (metadata). Read further here.
- Data Availability. Filter on available, pending, and not-yet-available datasets. Read further here.
- Documentation. This brings you to this page you are currently on.
- Login Page. Login on the HEAL Platform to leverage all features. Read further here.
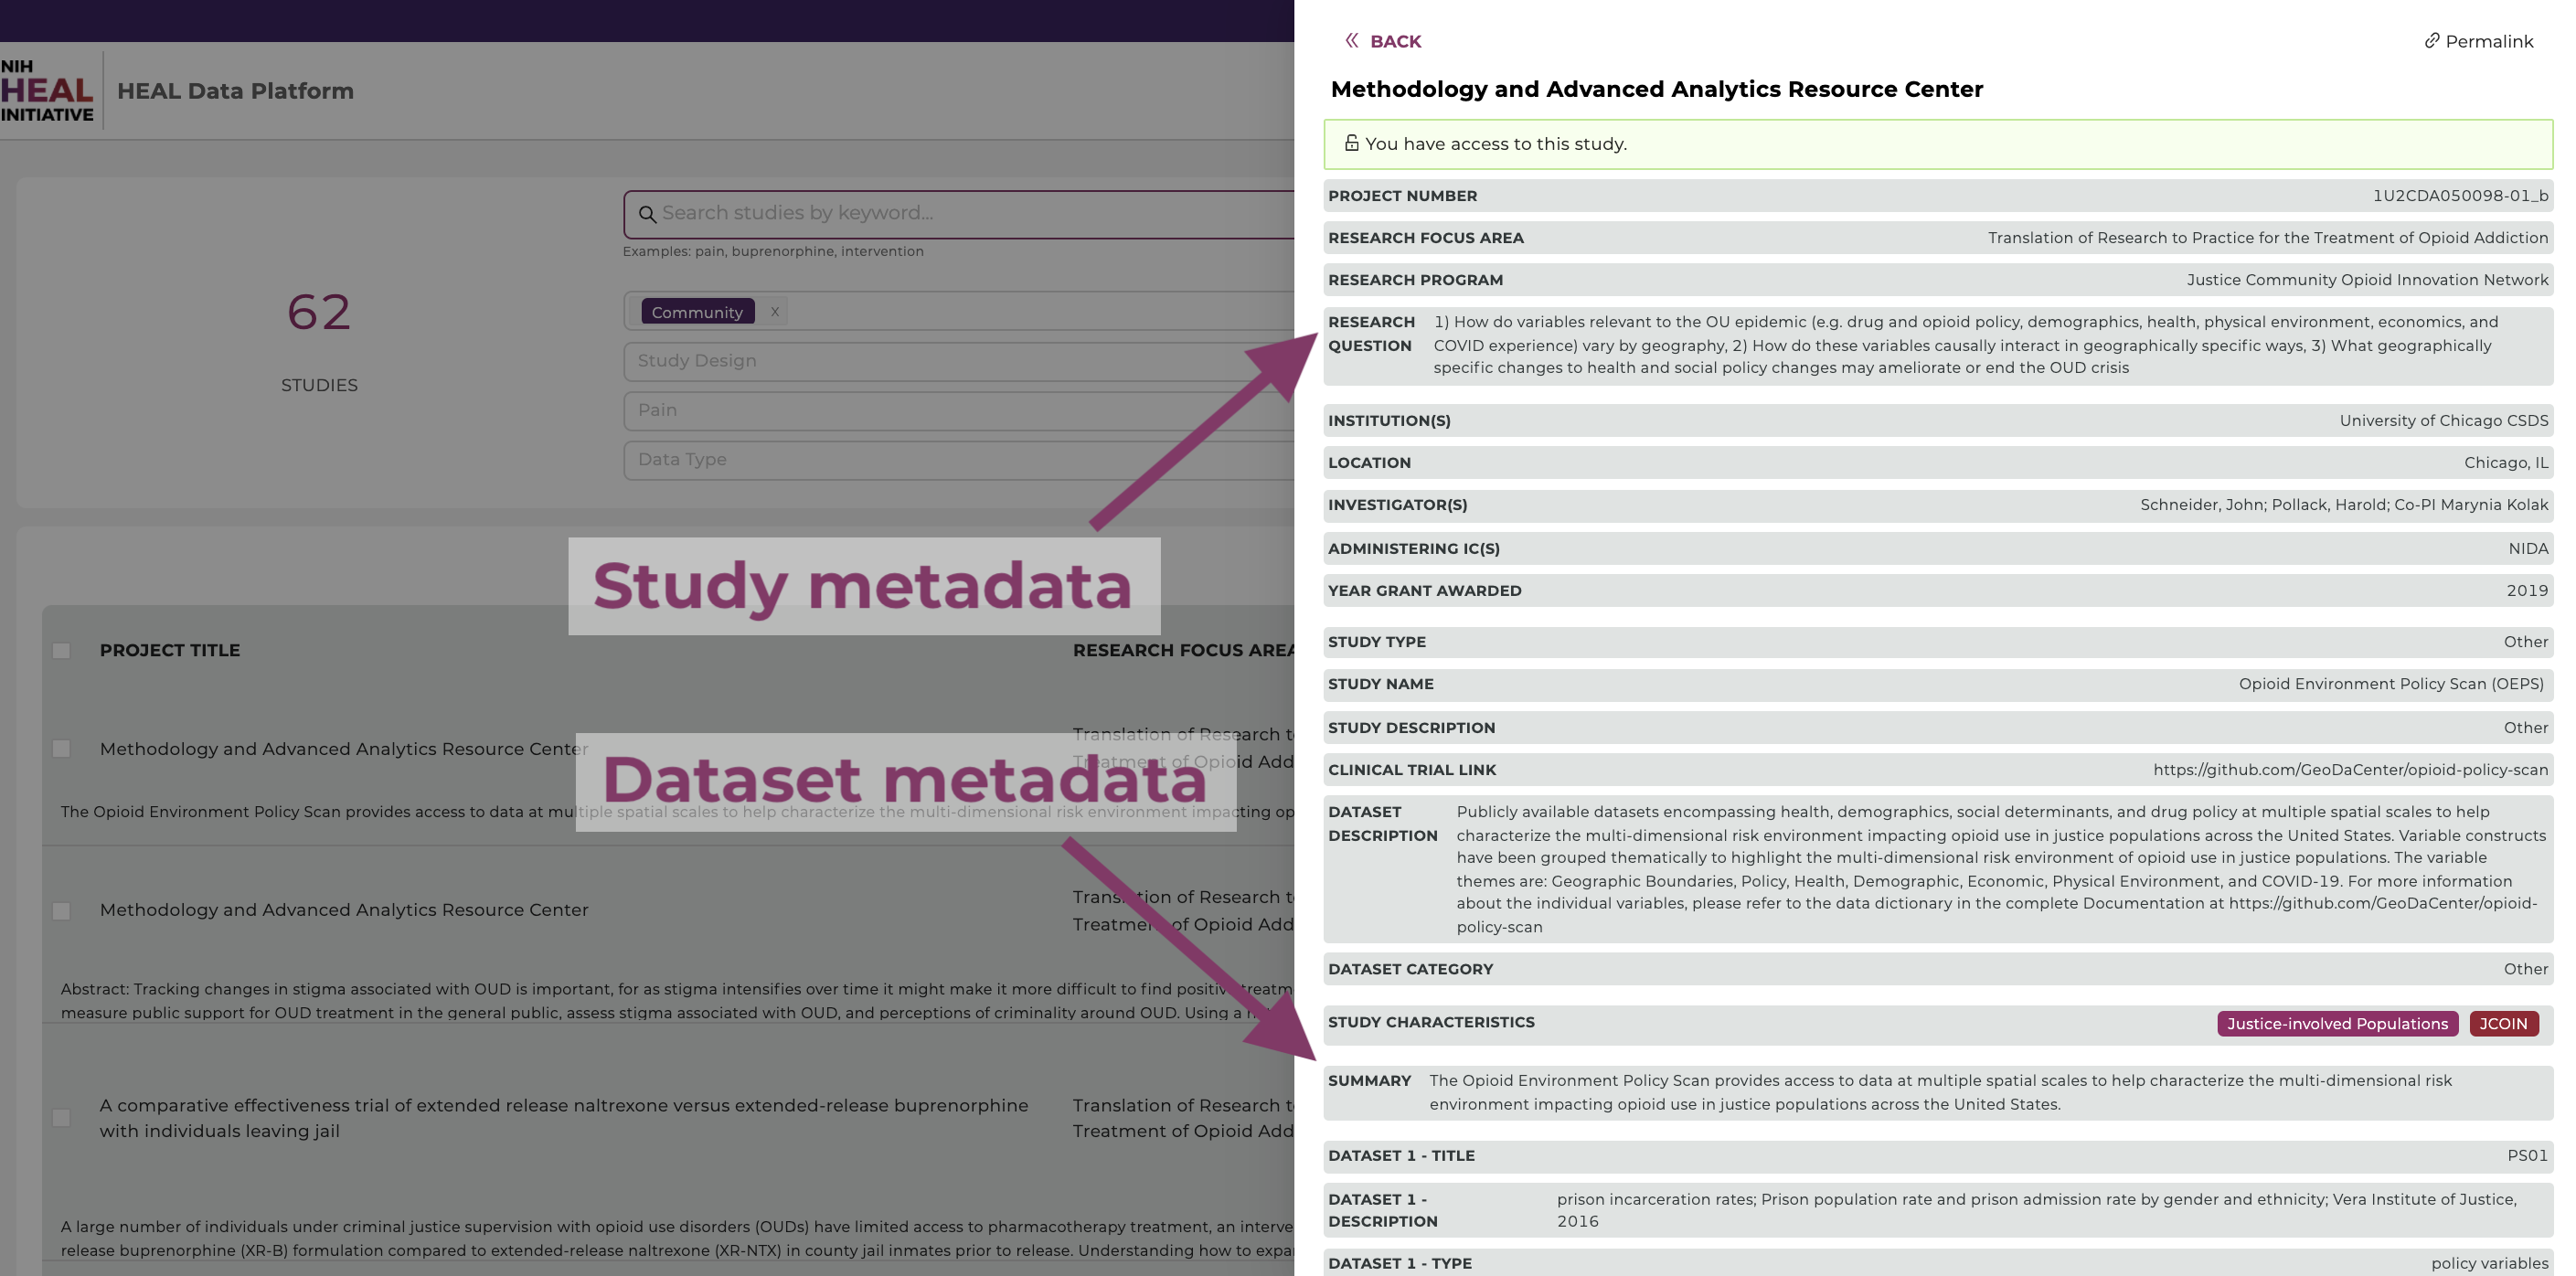
Find available Study-level Metadata
Finding available study-level metadata on the HEAL Platform is made easy by clicking on a study.
Find accessible Datasets
Users can select and filter studies from multiple resources and conduct analyses on the selected datasets in a workspace. Users can find search only available data they have access to by selecting the data access button in the top right corner of the study page and selecting “Data Availability" - "Available" as shown below. The Discovery Page will automatically update the list of studies that have available datasets.

Data Availability Options
Different options for Data Availability exist and will be explained below.
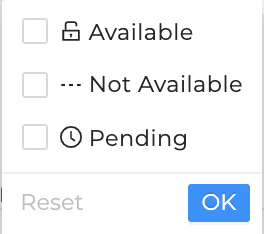
-
Available: This option will display only studies with datasets users have access to and entails all open-access studies. Studies can be selected and exported to a workspace or
downloaded by clicking on the associated checkbox on the left-hand side of the study entry and selecting one of the options in the top right.
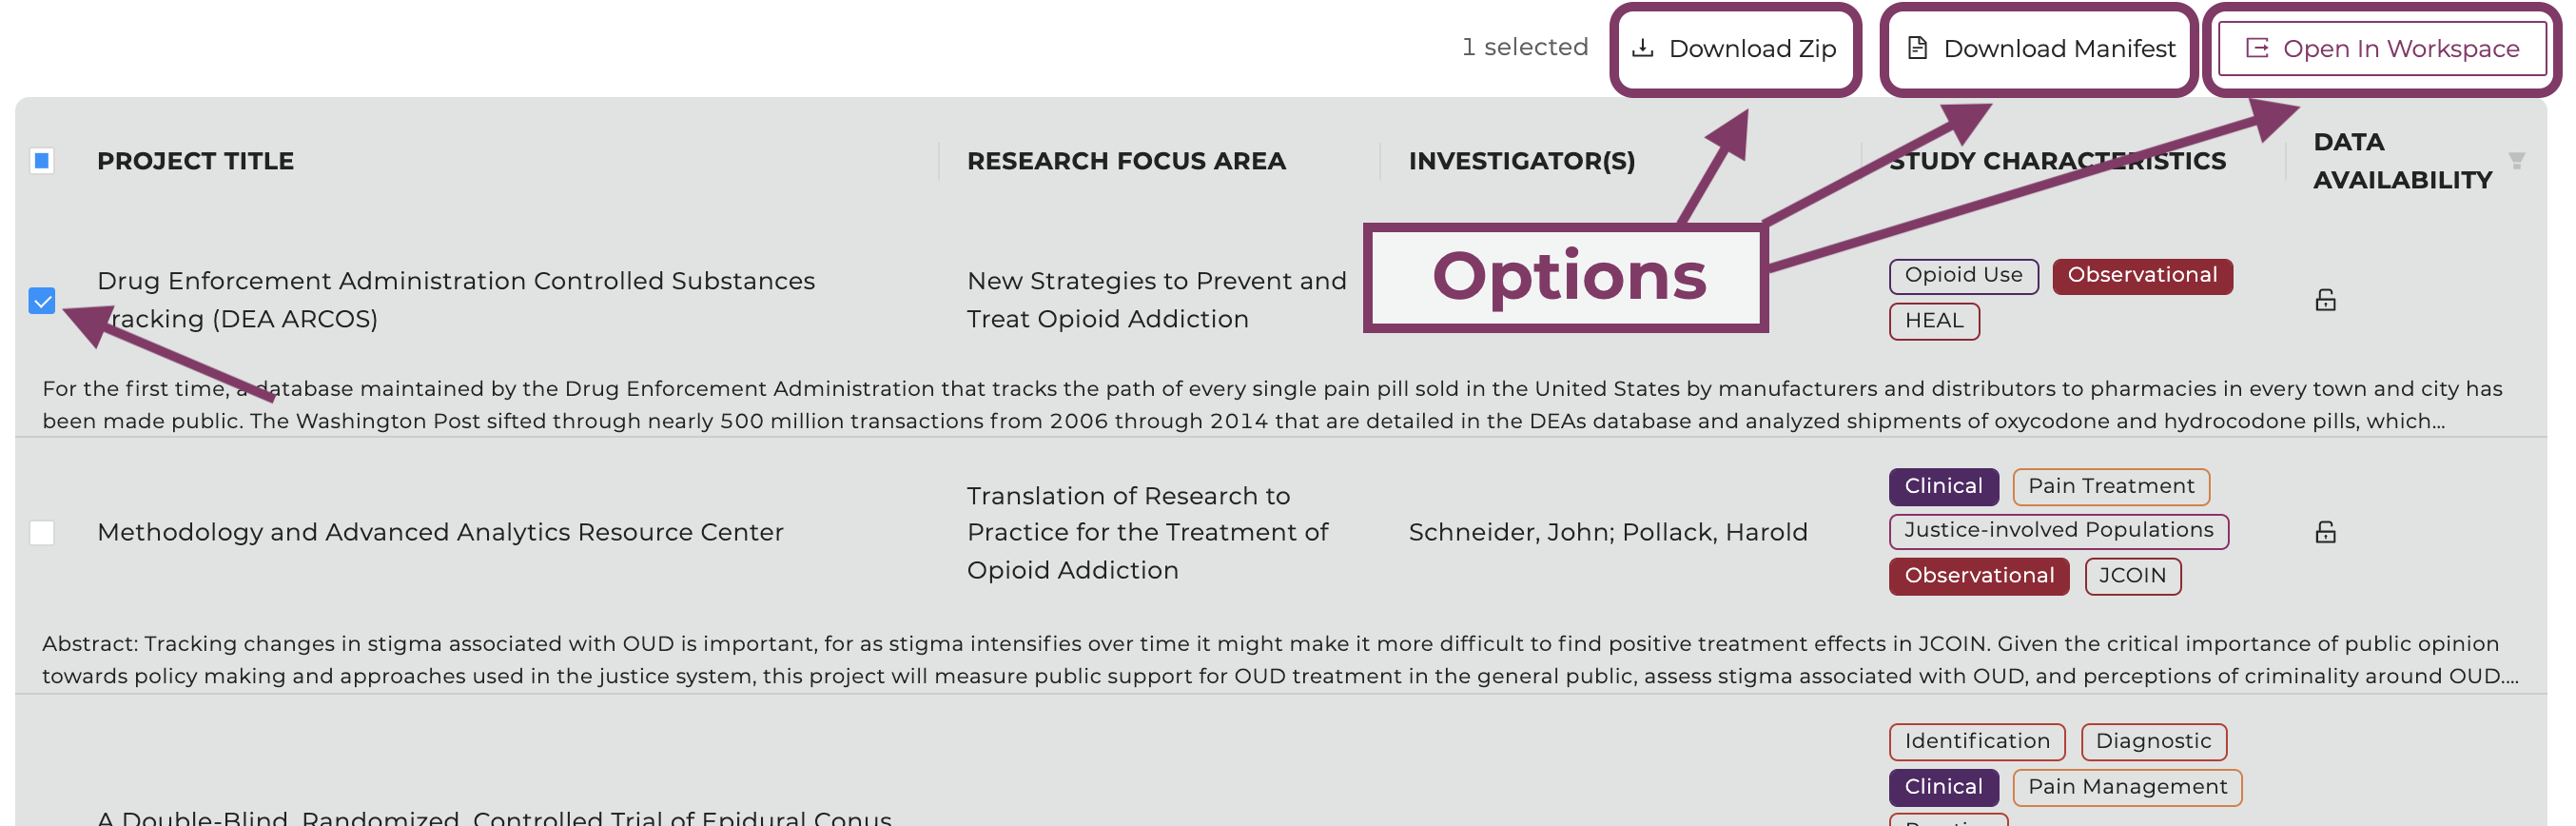
Once available, each study can be selected and exported to workspace or downloaded.
-
Not available: This option will filter out all studies that will only have metadata but no datasets available. The checkbox next to the study will be greyed out and non-clickable.
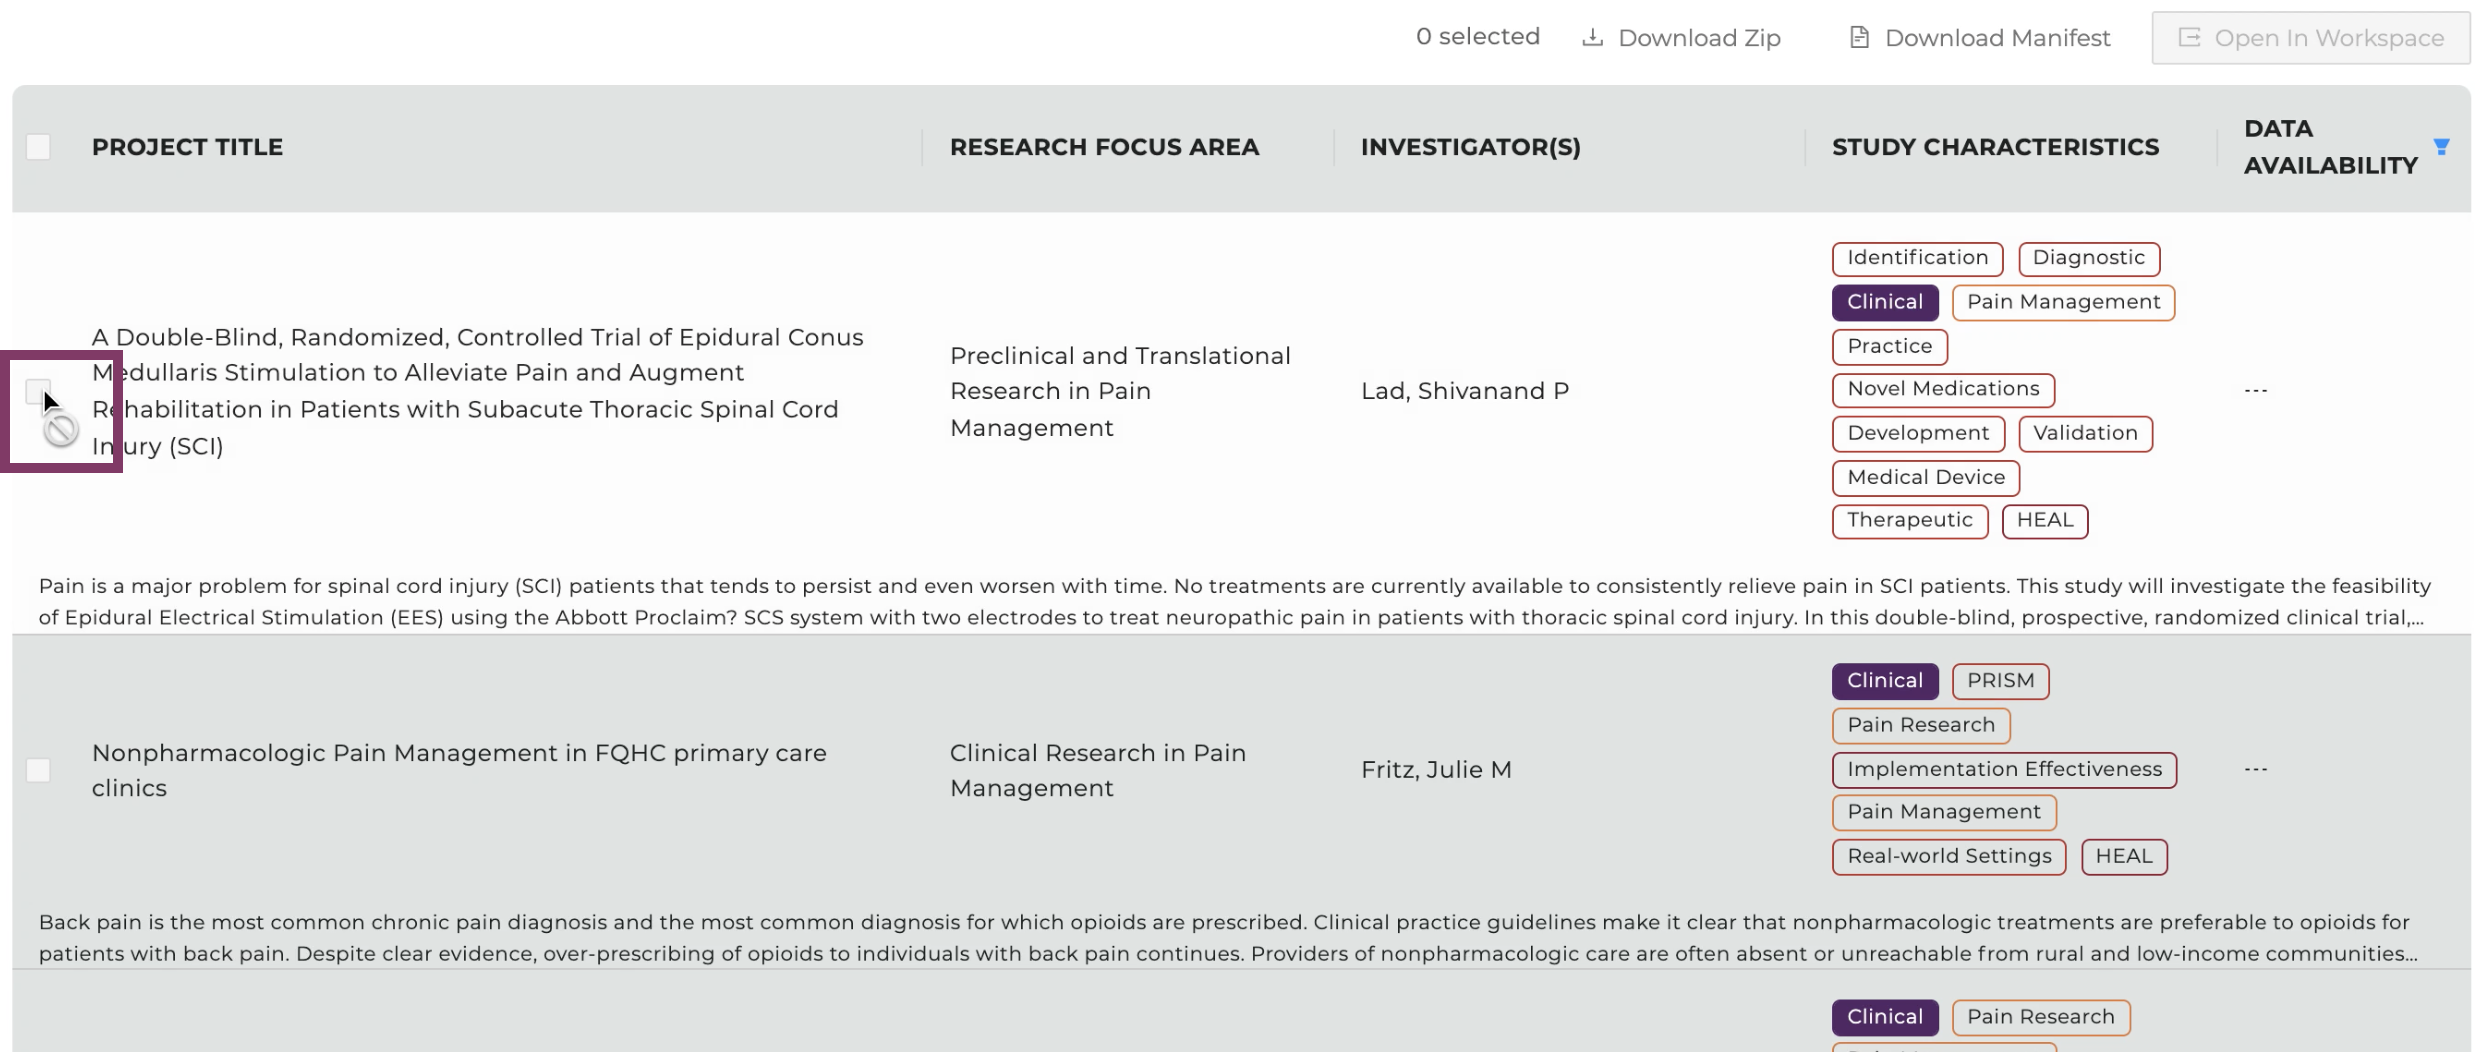
Studies will grey out if they're not available, have no data attached, users have no access to, or are in pending mode.
-
Pending: This option will display studies located on any data resource or repository, for which attached datasets will be added in the near future. The checkbox next to the study
will be greyed out and non-clickable as shown above.
Select Files on the Discovery Page and bring them to the Workspace
The above gif shows the workflow used to select data files from the Discovery Page and bring them into the workspace using Jupyter Notebooks.
-
Log in on healdata.org/login. Link your account to all FAIR repositories as described here.
-
Find and select the study by the project number (in this example: 1U2CDA050098-01_a) on the Discovery Page. Find other current open-access studies here.
-
Click the “Open in Workspace” button in the upper right corner. This step will create a manifest folder which you can find later in the Workspace’s folder "data/healdata.org".
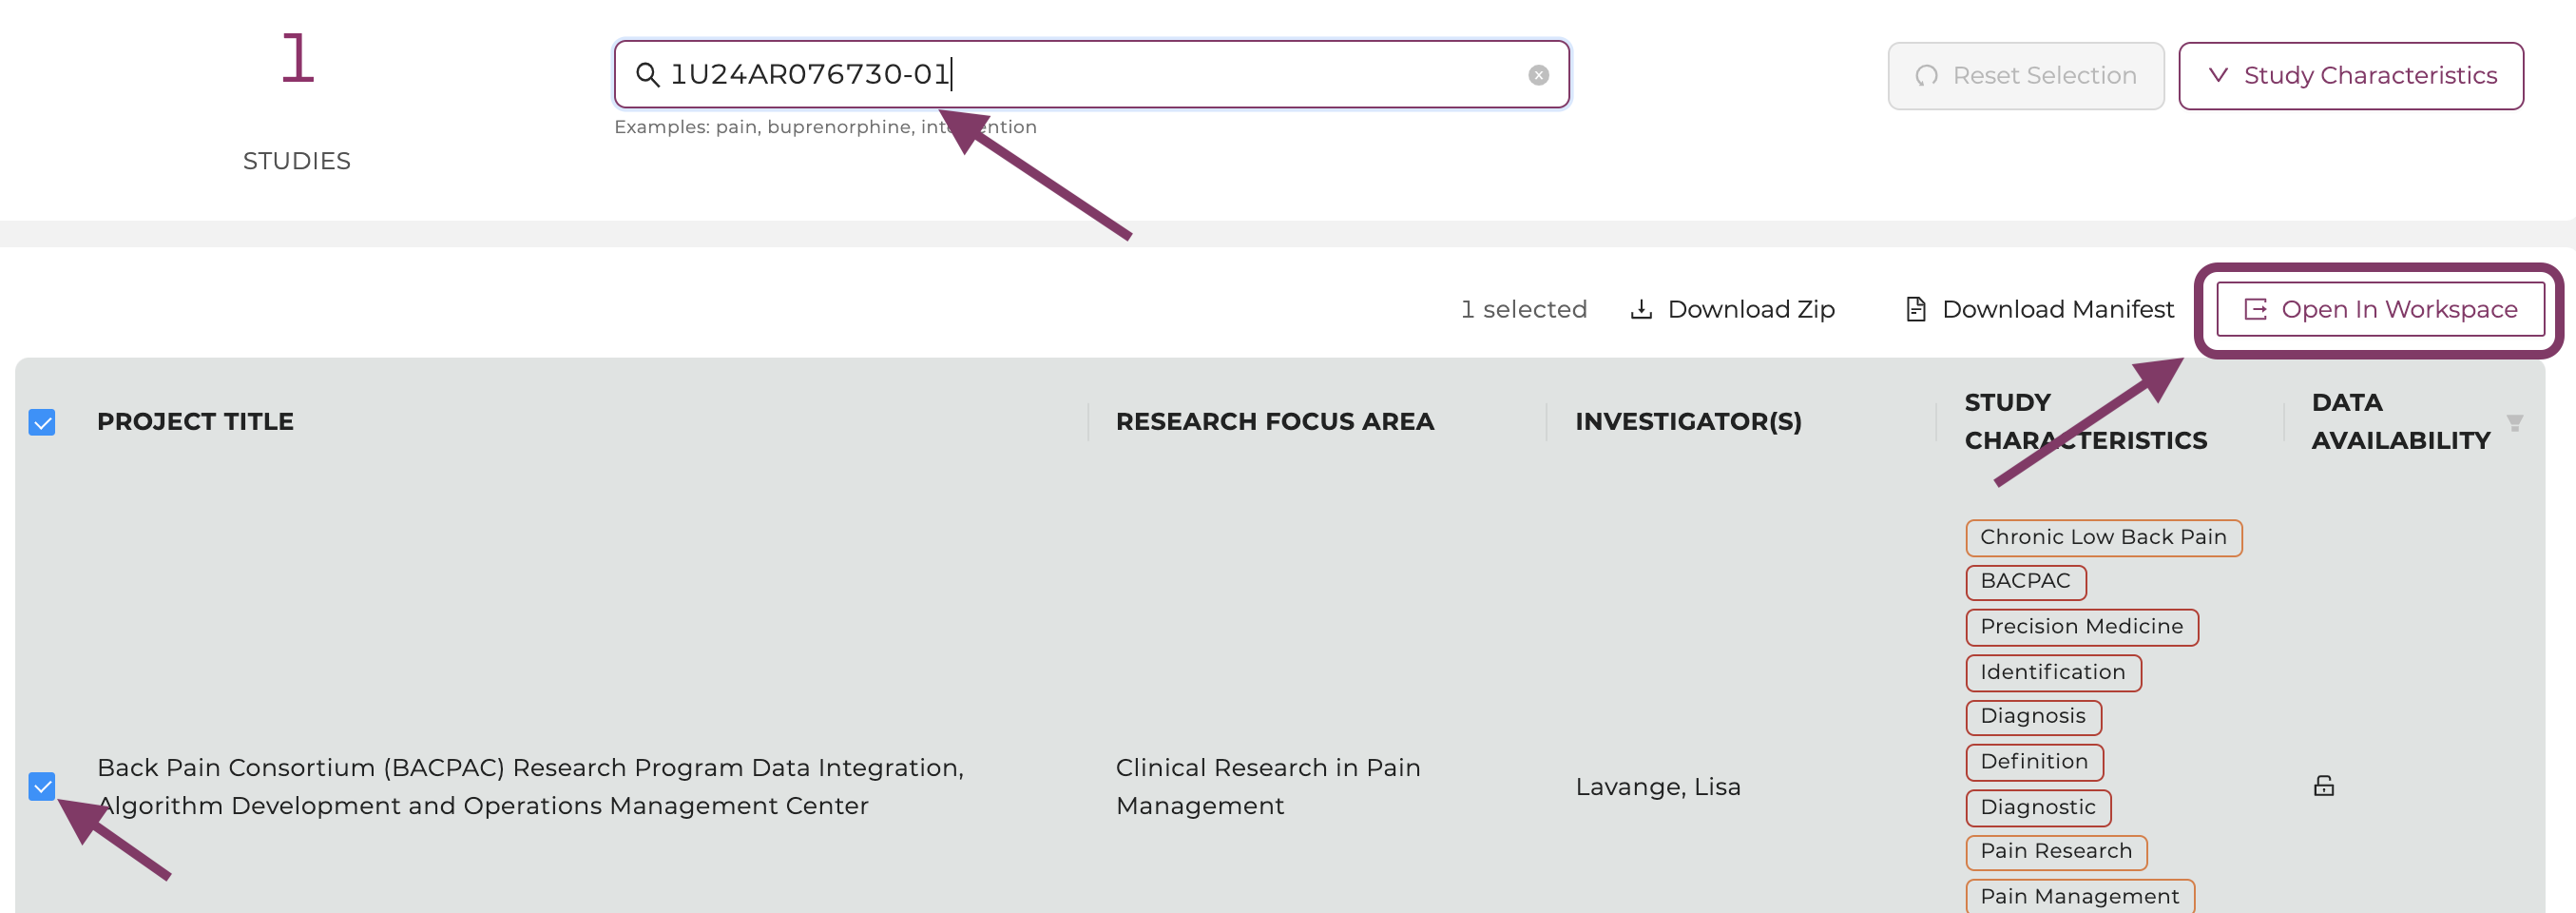
Select the study and click on “Open in Workspace”.
-
Choose a workspace flavor and click "Launch". This step may take several minutes.
-
Navigate to the
/pd/data/healdata.org/folder and find the placeholder files there. Click on those placeholder files to find instructions how to download the files or see below.
-
From the directory
/pd, users can now start a new notebook. Click “New” (upper right corner) or open a previously saved notebook on the landing drive to load the files into one of the cells, for example by running
                            ! gen3 drs-pull object "guid""

                            import pandas as pd

                            os.chdir('/pd')

                            demo_df = pd.read_csv('pd/demo_file.txt', sep='\t')

                            demo_df.head()
More information for instructions on importing data can be found in the sections "Download Files to Workspaces" and "Workspaces".
- Make sure to terminate the workspace when the work is finished to reduce computational costs.
- "pd" means persistent directory. Saved files outside this directory will be lost.
- The manifest.json lists metadata of all exported files and can be used to download in batches
- Note, that all exported data files will be saved in the/pd/data/healdata.org/folder.
- Please also note, that the workspace mounts up to a maximum of 5 different manifests while the workspace is running but shows only the latest exported manifest in a newly launched workspace.
- Terminating the workspace will result in the loss of all but the latests manifest.
e) Workspaces
HEAL Platform workspaces are secure data analysis environments in the cloud that can access data from one or more data resources. By default, Workspaces include Jupyter notebooks, Python and RStudio, but can be configured to host virtually any application, including analysis workflows, data processing pipelines, or data visualization apps.
New to Jupyter? Learn more about the popular tool for data scientists on Jupyter.org (disclaimer: CTDS is not responsible for the content).
Guideline to get started
- Users need to log in via healdata.org/login to access workspaces.
-
After navigating to healdata.org/workspace, users will discover a list of pre-configured virtual machine (VM) images, as shown below.
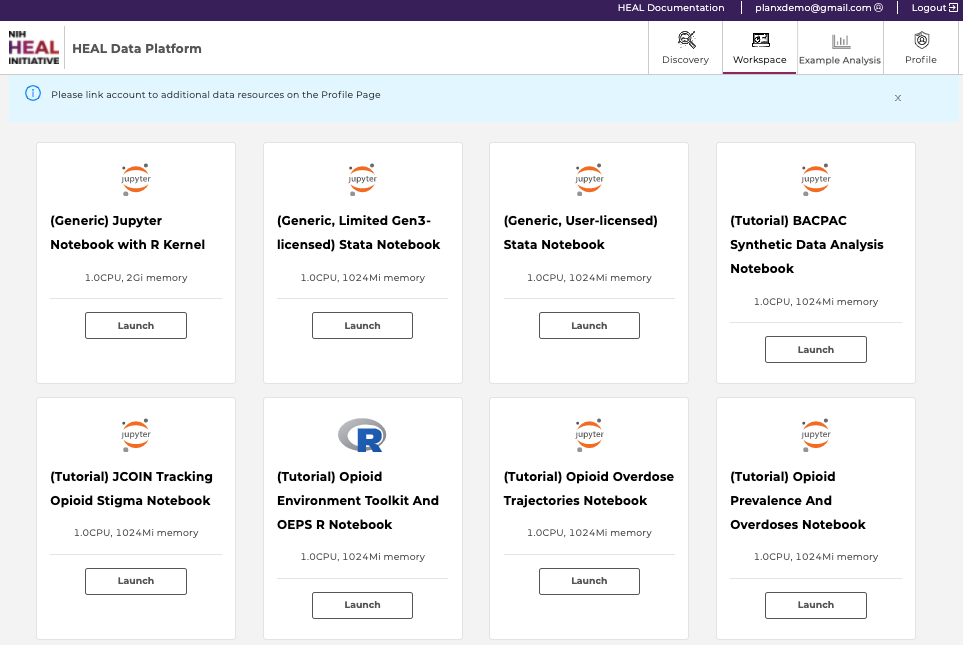
Available workspaces on the HEAL Platform (top). Users may need to link their accounts from other repositories (bottom; click here to see how).
- (Generic) Jupyter Notebook with R kernel: Choose this VM if you are familiar with setting up Python- or R-based Notebooks, or if you just exported one or multiple studies from the Discovery Page and want to start your custom analysis.
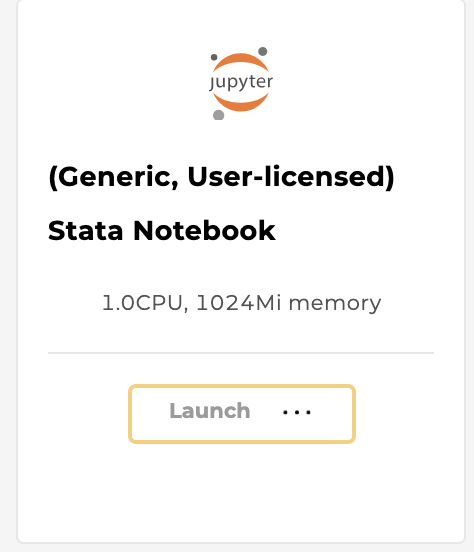
- (Generic, User-licensed) Stata Notebook: Choose this VM if you are familiar with STATA-based data analysis. This notebook requires a STATA license.
-
Tutorial Notebooks: Explore our Jupyter Notebook tutorials written in Python or RStudio, which pull data from various sources of the HEAL Data Ecosystem to leverage statistical
programs and data analysis tools.
All interactive tutorial notebooks can be also found as static version on the Notebook Browser tab; read more in the section "Example Analysis".
Feel free to edit and experiment with this collection of notebooks. They are your personal copies!
- Notebooks in Python: (1) BACPAC Synthetic Data Analysis, (2) JCOIN Tracking Opioid Stigma, (3) Opioid Overdose Trajectories, (4) Opioid Prevalence And Overdoses
- Notebooks in RStudio: (1) Opioid Environment Toolkit and OEPS
-
Click “Launch” on any of the above workspace flavors to spin up a copy of that VM. Note: Launching the VM may take several minutes.
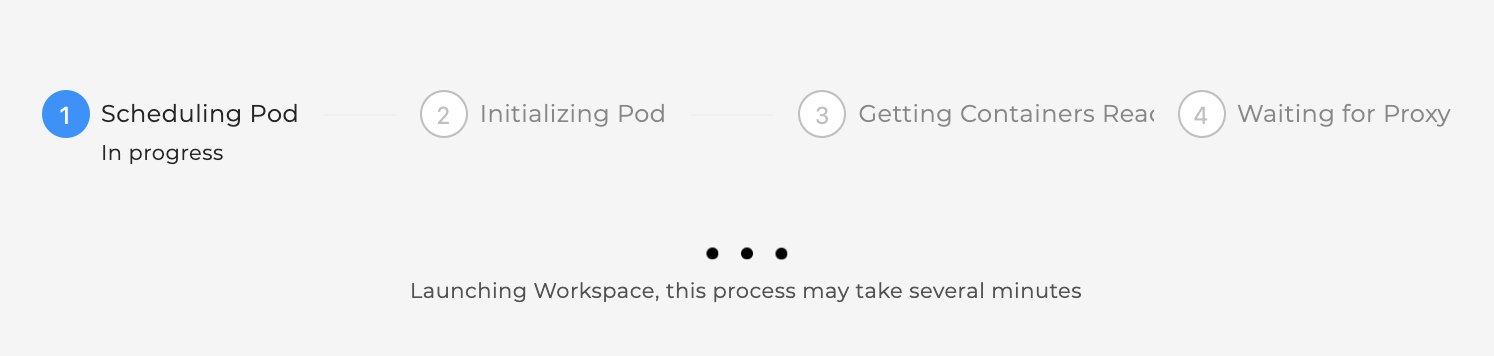
The status of launching the workspace is displayed after clicking on “Launch”.
-
After launching, the home folders are displayed, one of which is the user's persistent drive ("pd").
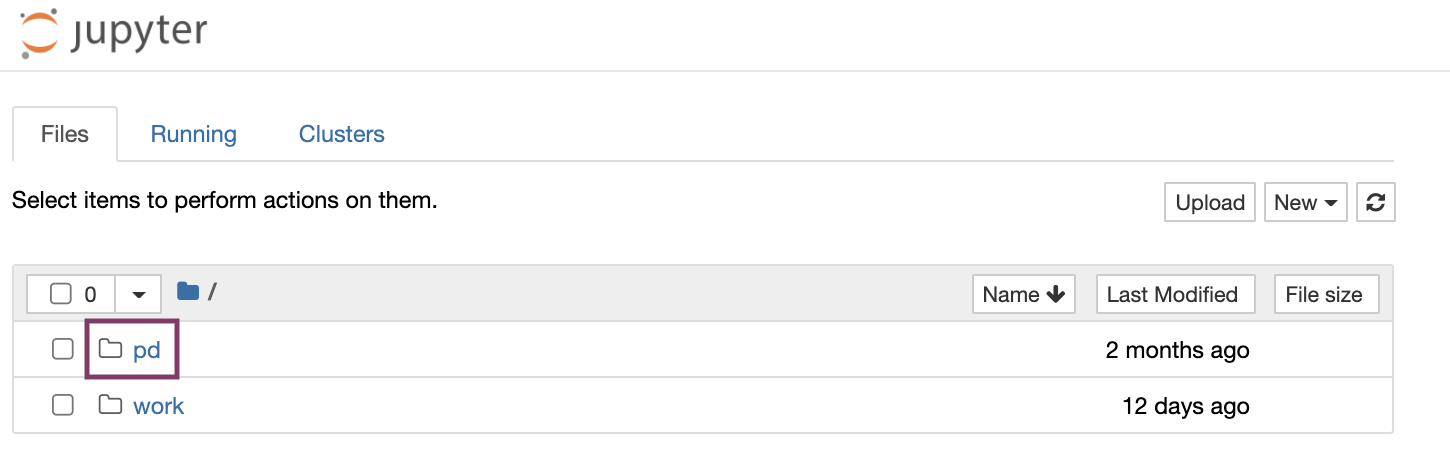
The /pd directory is a user’s persistent drive.
-
Select the /pd folder. Only files saved in the /pd directory will remain available after termination of a workspace session.
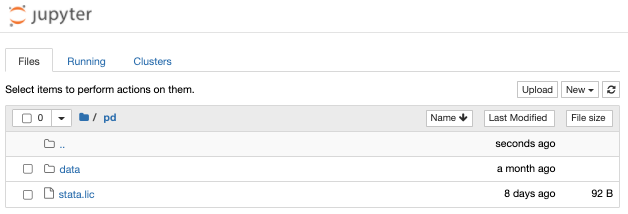
New files or licenses should be saved in the the /pd directory if users need to access them after restarting the workspaces.
- Attention: Any personal files in the folder “data” will be lost. Personal files in the directory /pd will persist.
- Do not save files in the "data" and “data/healdata.org” folders.
- The folder “healdata.org” in the “data” folder will host the data files you have exported from the Discovery Page.
-
Start a new notebook by clicking “New” in the top right corner and choose between Python 3 or R Studio as the base programmatic language.
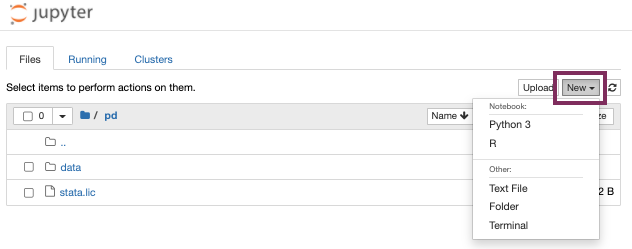
Start a new notebook under “New”.
-
Experiment away! Code blocks are entered in cells, which can be executed individually or all at once. Code documentation and comments can also be entered in cells, and the cell
type can be set to support Markdown.
Results, including plots, tables, and graphics, can be generated in the workspace and downloaded as files.
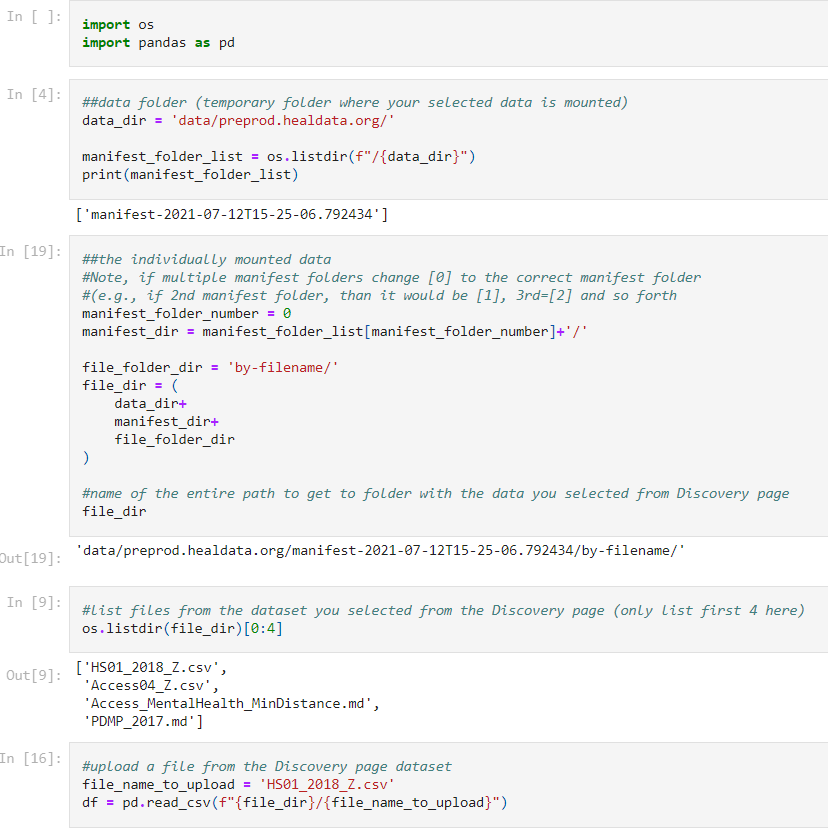
Users can import data files directly into the Notebook code after selecting files from the "Discovery Page". An example is shown below.
-
Do not forget to terminate your workspace once your work is finished to be mindful of the cost-intensive computational effort.
Note, that Workspaces automatically
shut down after 90 minutes of idle
time.
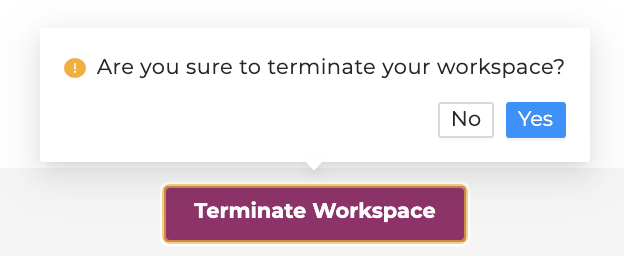
Do not forget to terminate your workspace once your work is finished. Unterminated workspaces continue to accrue computational costs.
Further reading: read more about how to download data files into the Workspaces here.
Upload, save, and download Files/Notebooks
Users can upload data files or Notebooks from the local machine to the home directory by clicking on “Upload” and access them in the Notebook (see below).
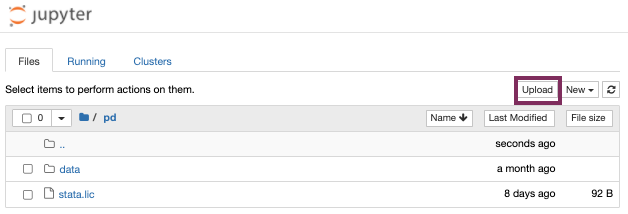
Then run in the cells, for example:
                import os

                import pandas as pd

                os.chdir('/data')

                demo_df = pd.read_csv('/this_is_a_demo.txt', sep='\t')

                demo_df.head()
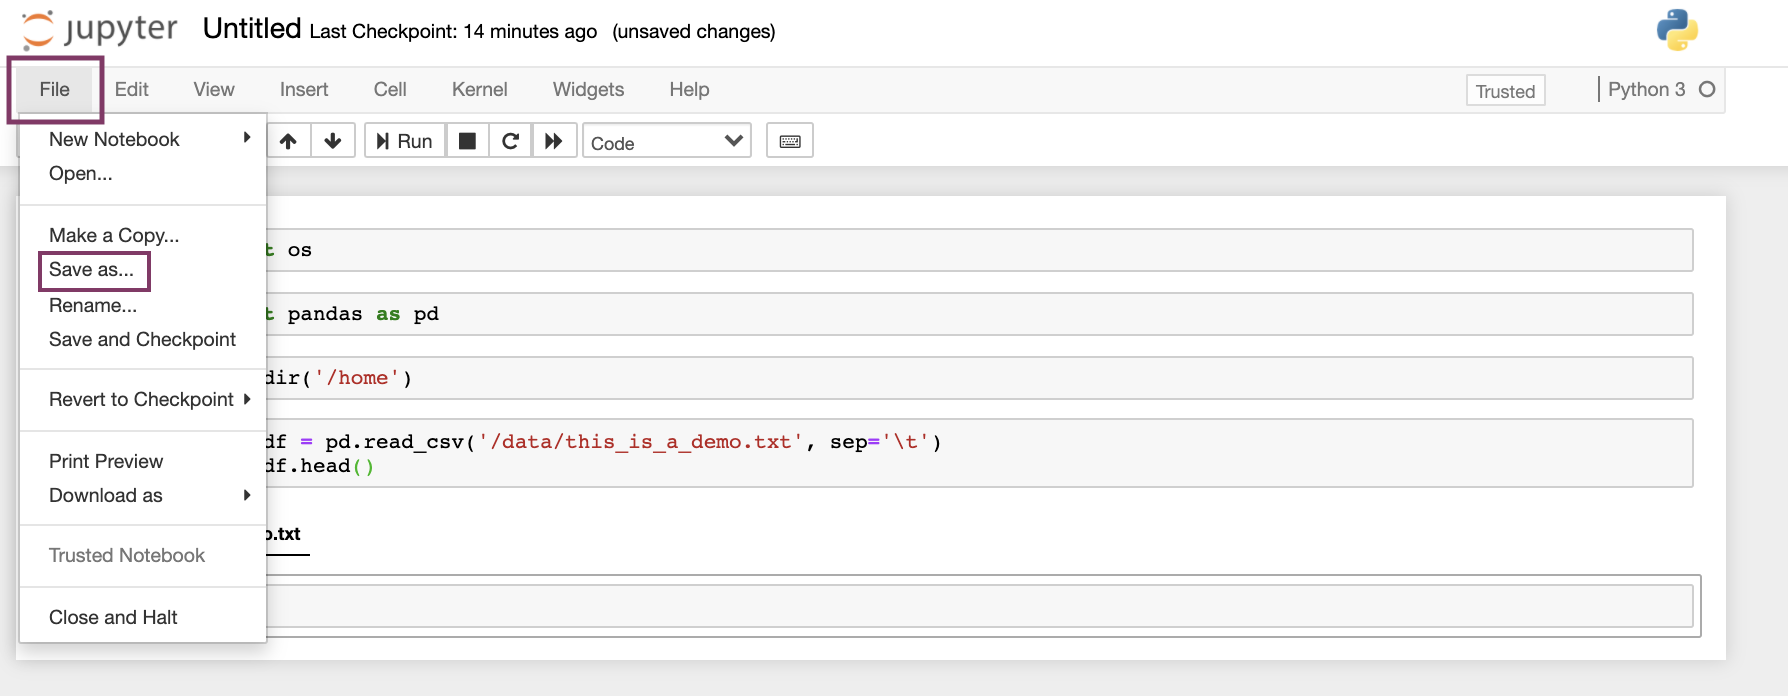
Users can save the notebook by clicking "File" - "Save as", as shown below.
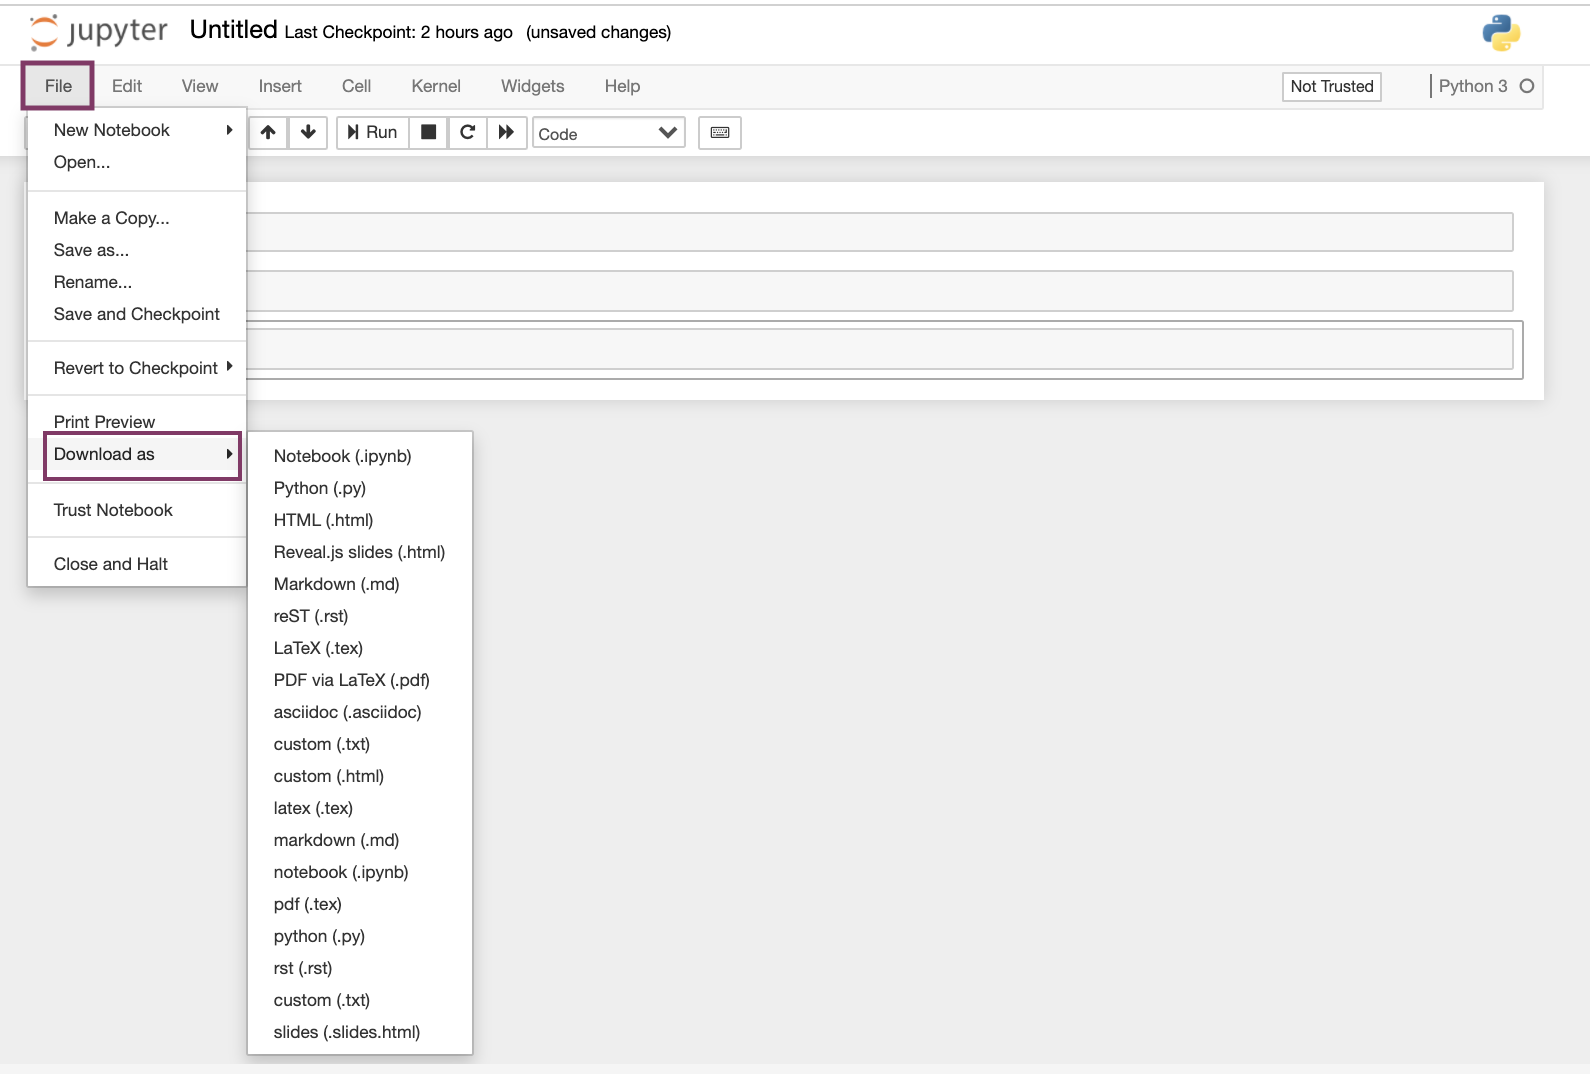
Users can download notebooks by clicking "File" - "Download as", as shown below.
Environments, Languages, and Tools
The following environments are available in the workspaces:
-
Jupyter
-
RStudio

The following programmatic languages are available in Jupyter Notebooks:
The following tools are available in Jupyter Notebooks:
- GitHub (read GitHub documentation)
Python 3 and RStudio in Jupyter
Both Python 3 and RStudio are available in Jupyter Notebooks.
Users can expect to be able to use typical Python or RStudio packages, such as PyPI or CRAN. For Python and RStudio, users can start a new notebook under
"New", as shown below.
STATA in Jupyter
STATA is available as language in Jupyter notebooks (either in Python or R kernels), but requires a license and a specific workspace.
Users need to first choose the following workspace "(Generic, User-licensed) Stata Notebook" in order to be able to use STATA:
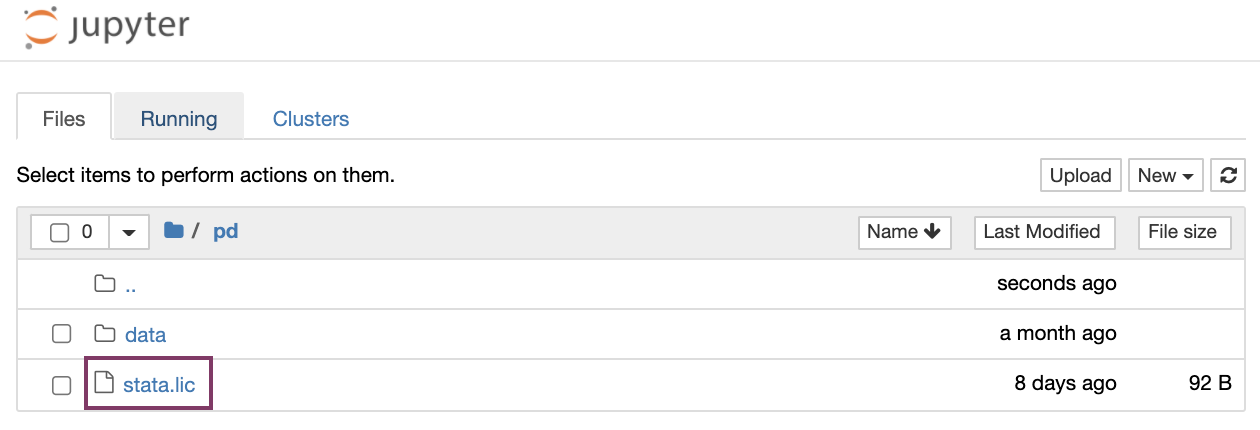
Users need to upload a license stata.lic to the /pd folder by selecting "Upload" (top right).
Note, that uploading the license can also be achieved programmatically by opening a new terminal window under "New" - "Terminal", finding the directory /pd by typing:
cd pd
. Then, create a file using vim:
vim stata.lic
. This will open the file in the terminal. Users can copy the license, then hit : + wq.
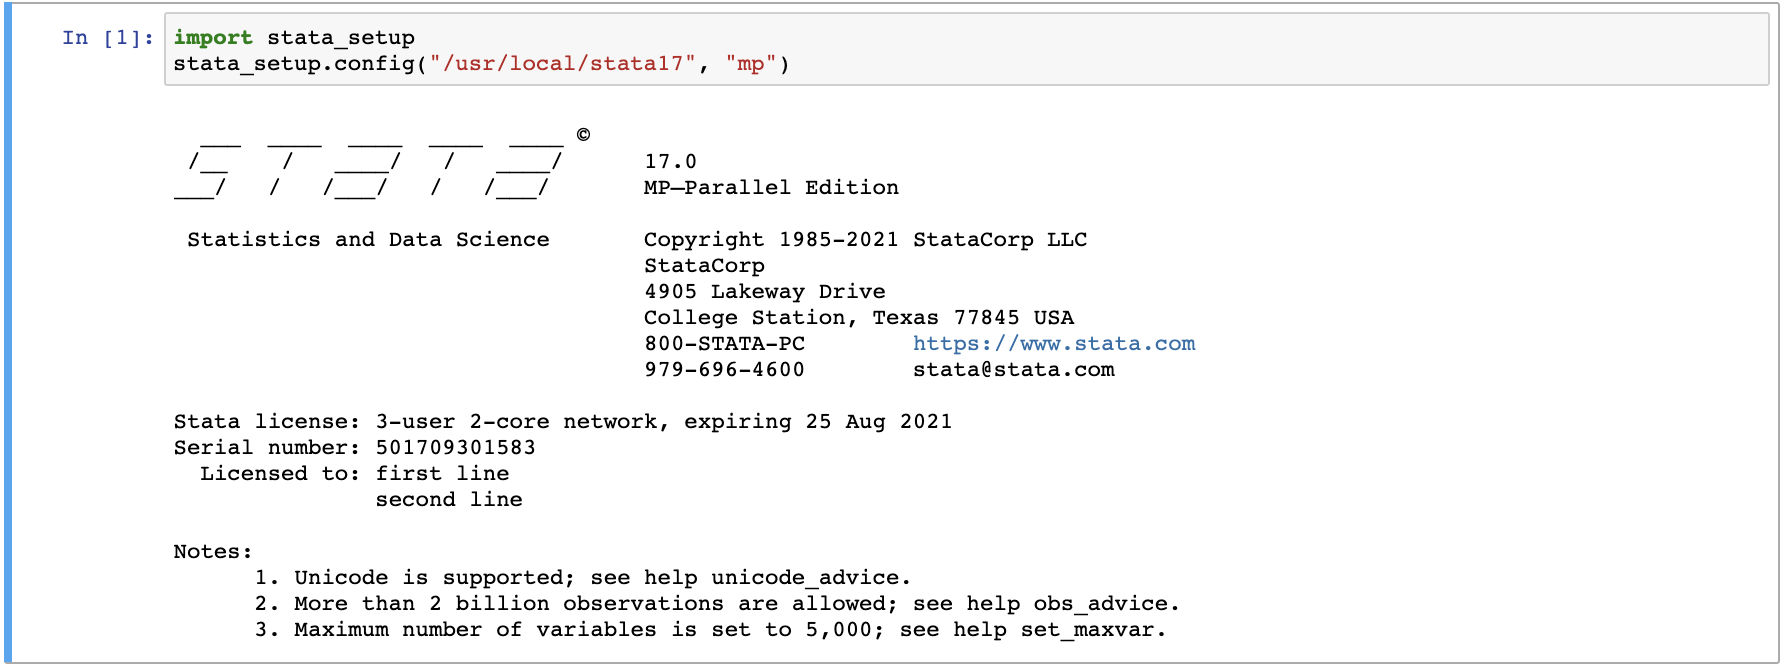
Then, users need to start a new notebook under "New" (choose either R or Python). Run the following code in the first cell:
                    import stata_setup

                    stata_setup.config("/usr/local/stata17", "mp")
This will return the following:
Users can then begin using the notebook by typing in known STATA commands, for example
%% stata . describe
.
Troubleshooting
- If the kernel died, make sure to be logged in on 1) the Login Page 2) have enabled access to the FAIR enabled repository
Automatic Workspace Shutdown
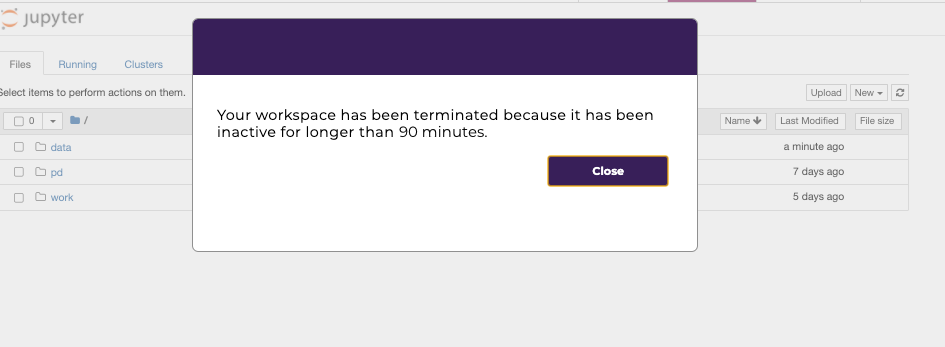
Workspaces automatically shut down after 90 minutes of idle time and a pop-up window will remind users before the workspace shuts down.

After the workspace has been shut down, users will be notified with the following pop-up window.
f) Example Analysis
The Example Analysis page contains a collection of view-only tutorial Jupyter Notebooks that provide demo analyses of datasets published on the HEAL platform.
This tab acts as a 'visual table of contents’ of available HEAL datasets.
“HEAL Example Analysis”
This video introduces users to the Example Analysis page, where users can browse Jupyter notebook demos to explore previous data analyses on the HEAL
platform.
If your Browser does not support watching this video, here's a link to the
video instead.
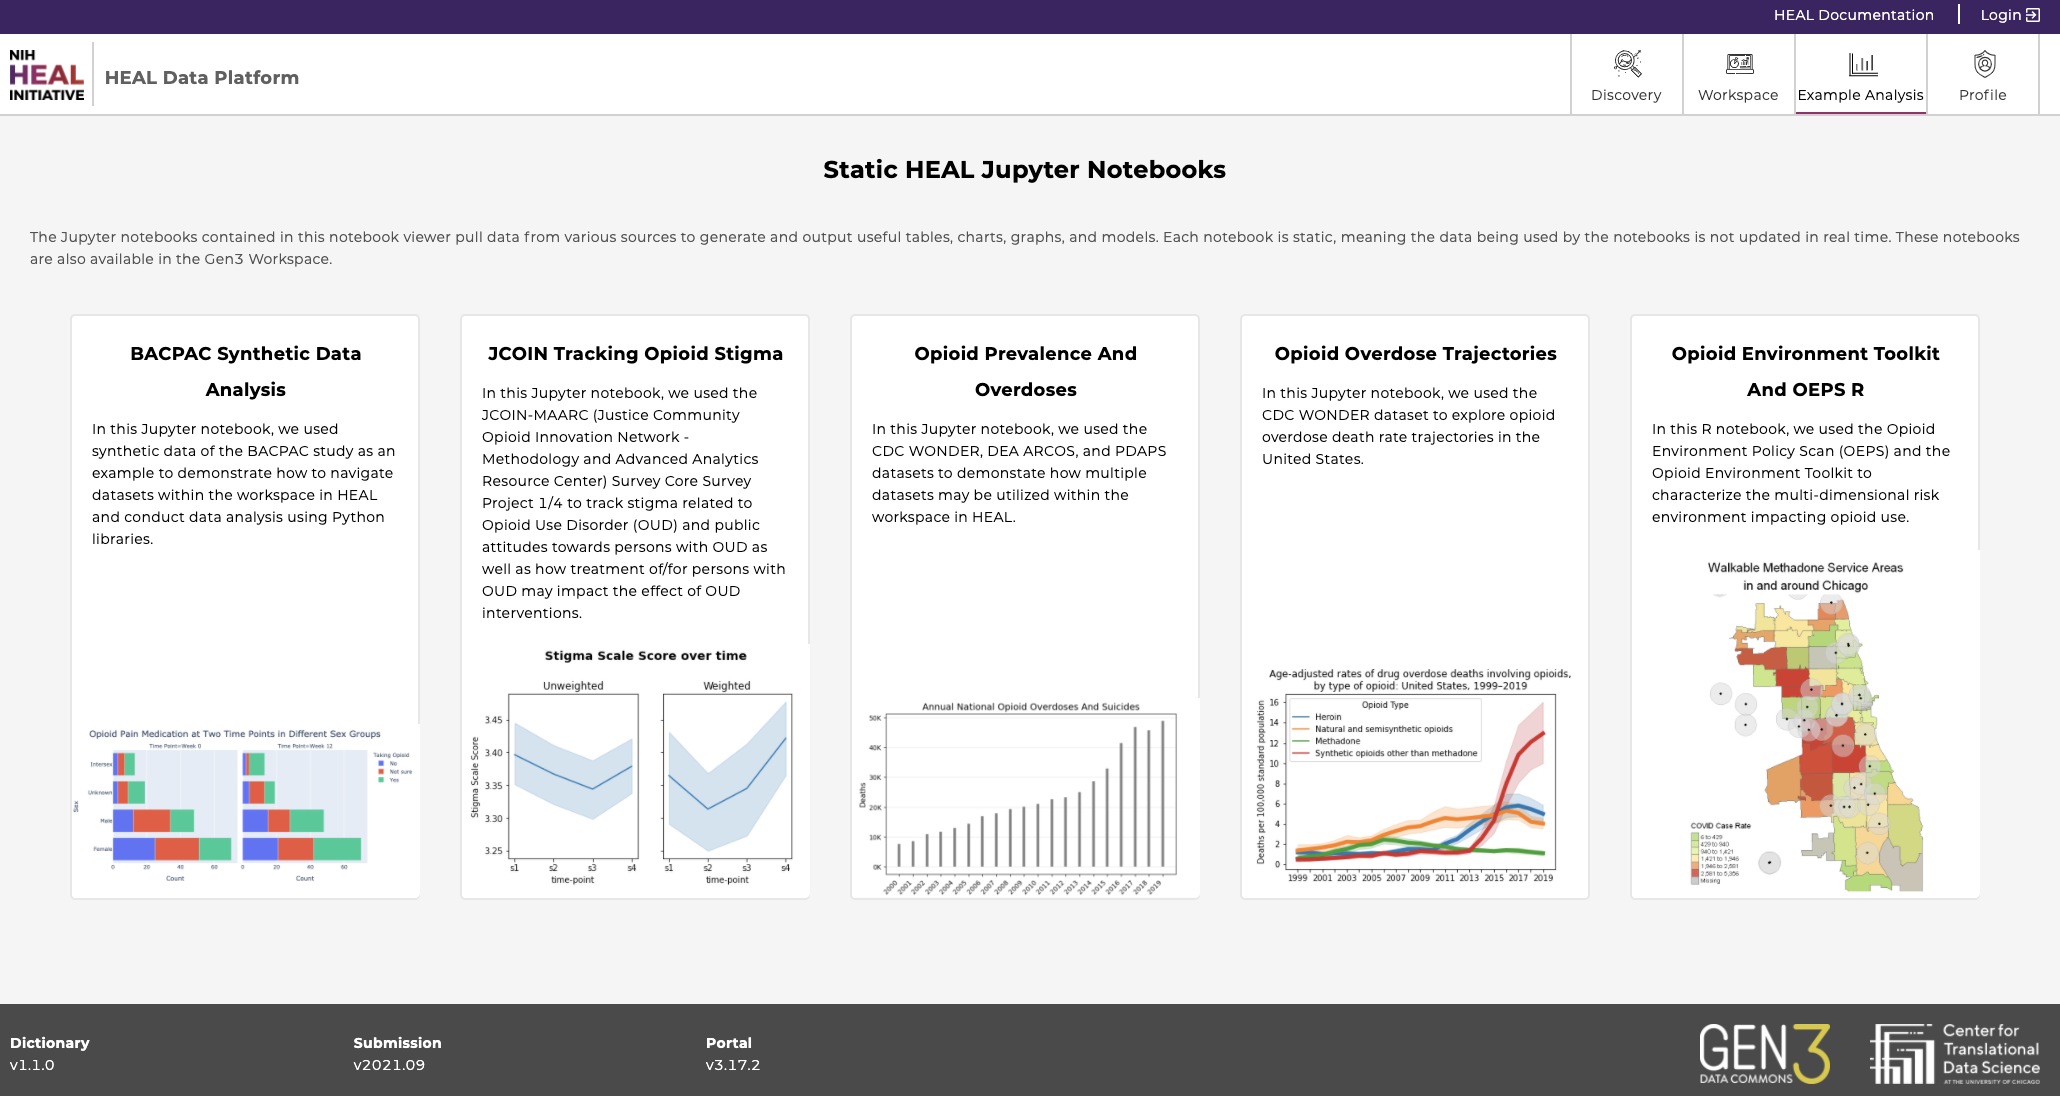
Why tutorial Notebooks?
These notebooks will allow users to learn how to analyze and visualize data available on the HEAL platform - without having to take the additional steps of finding and exporting the data used by the tutorial first.
All tutorial notebooks are static, view-only, and can be downloaded as.htmlfiles.
Find the notebooks in interactive mode in the Workspace tab.
Find below a description of how to work with the tutorials in the workspaces.
These tutorial notebooks are meant to:
- Give users a sense for how the platform can be used to analyze data.
- Bring complementary datasets together.
- Be used as a launching point for the users’ own custom analysis.
- Spark imagination about how users can incorporate the platform data access, analysis, and collaboration tools into their own research and data analysis process and pipelines.
The “Example Analysis” tab will be regularly updated with new and exciting tutorial data analysis notebooks, as more datasets are published and brought together in novel ways on the Platform.
Currently available Notebooks
Find below a list of notebooks that are currently available and which datasets they’re based on.
Click here to watch demo videos about how to use the tutorial Jupyter Notebooks as a launching point for your own custom analysis.
Please link your account to all FAIR repositories before working with the Notebooks in interactive mode.
|
Notebook Name |
Project Title |
Project Number |
Datasets used | Language |
|---|---|---|---|---|
| BACPAC Synthetic Data Analysis |
Back Pain Consortium (BACPAC) Research Program Data Integration, Algorithm Development and Operations Management Center |
1U24AR076730-01 |
1) participant_ SMART.tsv 2) substance_use_ SMART.tsv 3) physical_function_ SMART.tsv |
Python |
| JCOIN Tracking Opioid Stigma |
Methodology and Advanced Analytics Resource Center |
1U2CDA050098-01_a |
1) JCOIN_NORC_ Omnibus_SURVEY1_ Feb2020.sav 2) JCOIN_NORC_ Omnibus_SURVEY2_ April2020.sav 3) JCOIN_NORC_ Omnibus_SURVEY3_ June2020.sav 4) JCOIN_NORC_ Omnibus_SURVEY4_ Oct2020.sav |
Python |
| Opioid Prevalence And Overdoses |
1) Drug Enforcement Administration Controlled Substances Tracking (DEA ARCOS) 2) Prescription Drug Abuse Policy System 2b) 3) CDC Wide-ranging Online Data for Epidemiologic Research (CDC WONDER) Mortality Multiple Cause-of-Death Public Use Record |
1) deaarcos1 2) 57b45d83d6 c9e7e8693ccdfd 3) cdcwonder |
1a) dea_arcos_drug_list.tsv 1b) dea_arcos_county_ population.tsv 1c) dea_arcos_combined_ county_annual.tsv 1d) dea_arcos_state_population.tsv 2a) 20170216-RM-Stat-Data.xlsx 2b) Naloxone_Data_09112020.xlsx 2c) 20180810_Good_Samaritan_ Law_Stat_Data.xlsx 3a) CDC_WONDER_unintentional_ overdoses.tsv 3b) CDC_WONDER_suicide_ overdoses.tsv 3c) monthly_unintentional_ overdoses.tsv |
Python |
| Opioid Environment Toolkit and OEPS R (Watch tutorial) |
Methodology and Advanced Analytics Resource Center |
1U2CDA050098-01_b |
1) ZIP_COUNTY.xlsx 2) us-wide-moudsCleaned.csv 3) zctas2018.shp |
RStudio |
| Opioid Overdose Trajectories (Watch tutorial) |
CDC Wide-ranging Online Data for Epidemiologic Research (CDC WONDER) Mortality Multiple Cause-of-Death Public Use Record |
cdcwonder |
1) deaths_gender.xlsx 2) deaths_age_cat.xlsx 3) deaths_type_opioid.xlsx 4) cdc_wonder_year_cause_ hedegaard_et_al_2020.txt 5) cdc_wonder_year_cause_ state_hedegaard_et_al_2020.txt |
Python |
Working with the Tutorial Notebooks in interactive mode
- Notebooks require linked access to all FAIR enabled repositories, as described here.
- Code in the notebooks is editable, and users can import additional datasets and extend their analysis.
Demo - How to find data and work on the Tutorial Notebooks
Below we describe the steps to export data from the Discovery Page tutorial Jupyter notebooks for one example tutorial notebook BACPAC_Synthetic_Data_Analysis.ipynb (“BACPAC synthetic data analysis”)
Users must be logged in and have their accounts linked to the FAIR repositories in order to follow the steps below.
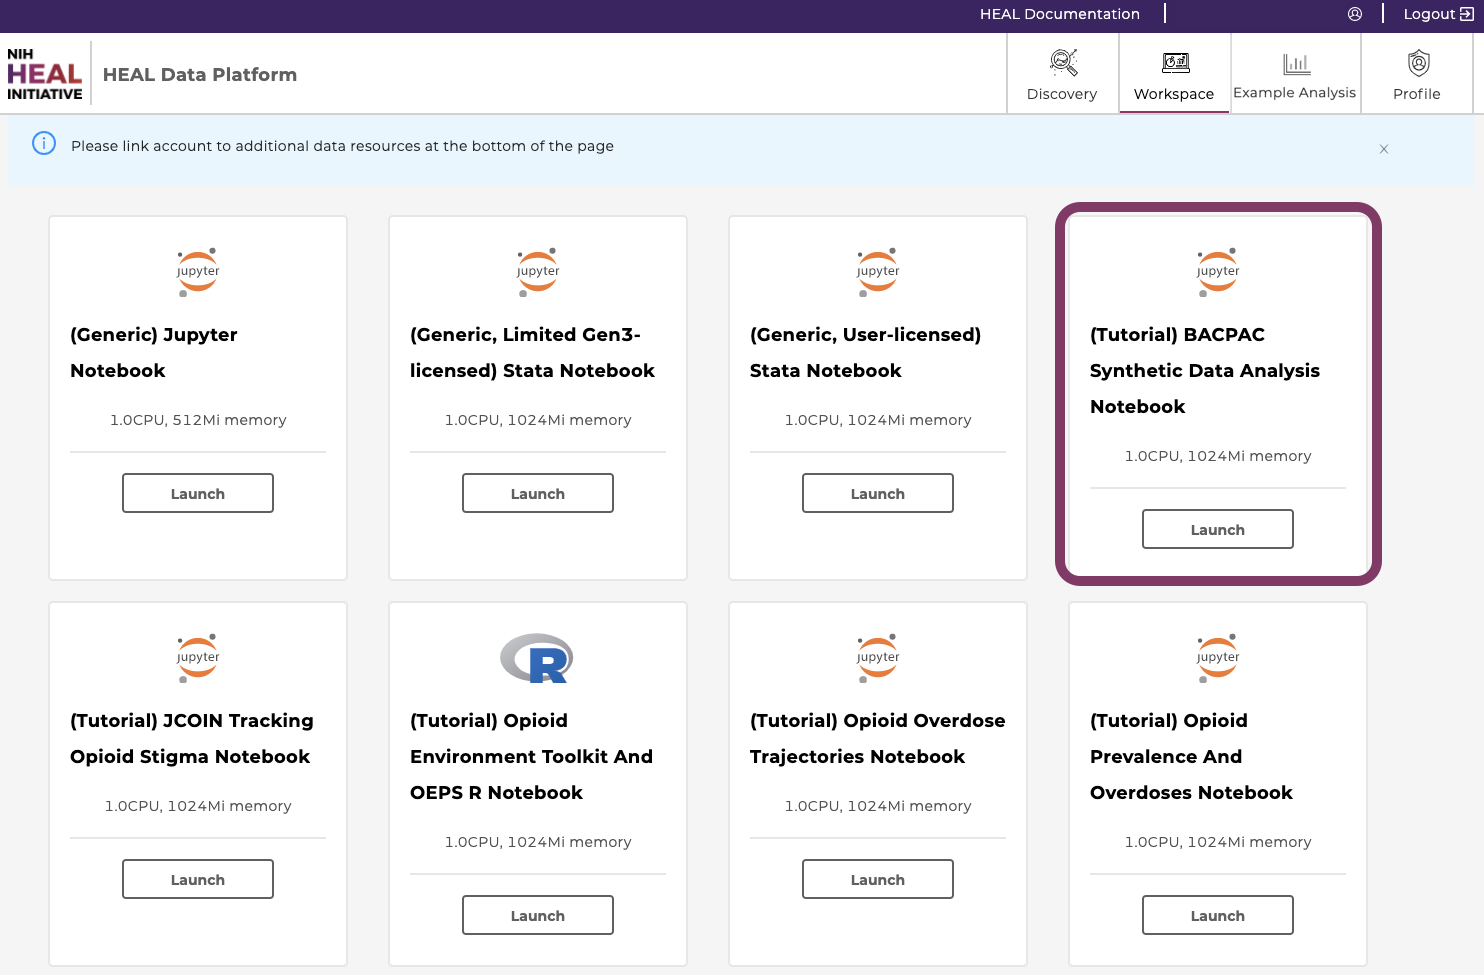
-
Go to the Workspace tab and click “Launch” on the “BACPAC Synthetic Data Analysis Notebook”. This may take a few minutes to load.
Note, that depending on the chosen notebook, this step varies to align with the name of the notebook/workspace.
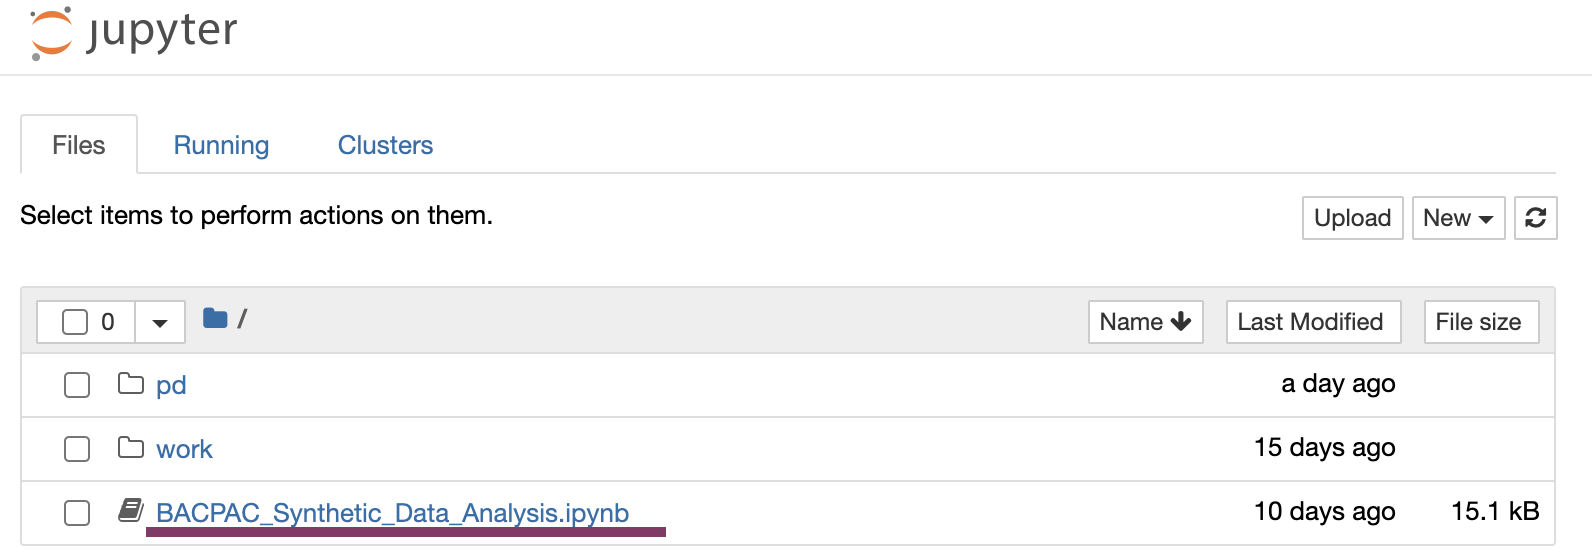
-
Find and open the notebook in the landing directory by clicking on “BACPAC_Synthetic_Data_Analysis.ipynb".
-
Click the first two cells and run them by clicking into the cell and either using shift+enter on the keyboard or selecting “Run”. Uncomment the commands as displayed below to install necessary packages.
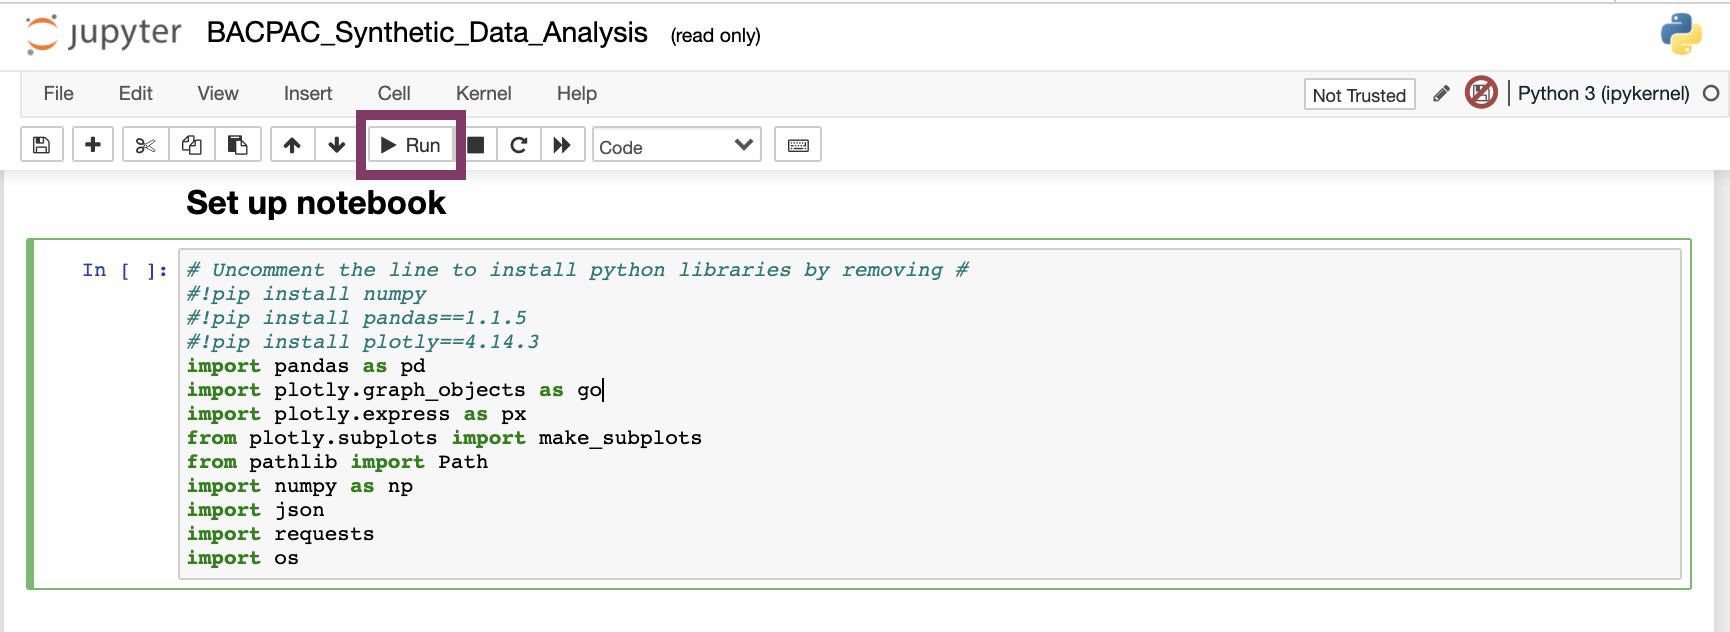
-
Run the next cell to import the data files.

-
Explore the rest of the notebook. If you want to make changes, make sure to save the notebook as a new file in the directory "pd".
- Make sure to terminate the workspace when the work is finished to reduce computational costs.
Note: Work must be saved in the directory "/pd" in order to remain accessible after workspace termination. Note, that Workspaces automatically shut down after 90 minutes of idle time.
g) Profile Page
On the profile page users will find information regarding their access to projects, access to Gen3-specific tools (e.g. access to the /workspace), and the function to create API keys for credential downloads. API keys are necessary for the downloadof files using the Gen3-client; for more information see chapter 4.
5. Downloading Data Files
Users can download data files associated with a study by downloading the files directly from the Discovery page, or leveraging the CTDS-owned python software development kit (SDK) and the tool “Gen3-client” if the file size exceeds 250 MB.
Note that current studies that have datasets of more than 250 MB are those with the following project numbers: a) cdcwonder and b) deaarcos1.
Note, that accessing data files requires linked access to all FAIR enabled repositories, as described here. A pop-up window will remind users:
a) Download Data Files from the Discovery Page
Users can download data files up to sizes of 250 MB directly from the Discovery Page.
Below you find the simple steps to do so.
-
Navigate to the Discovery Page. Link your accounts to FAIR repositories as described here.
-
Find the study of interest by using the search
features or the list of accessible studies.
-
Select the clickable box next to the study.
Click on "Download ZIP", which will initiate the data download.
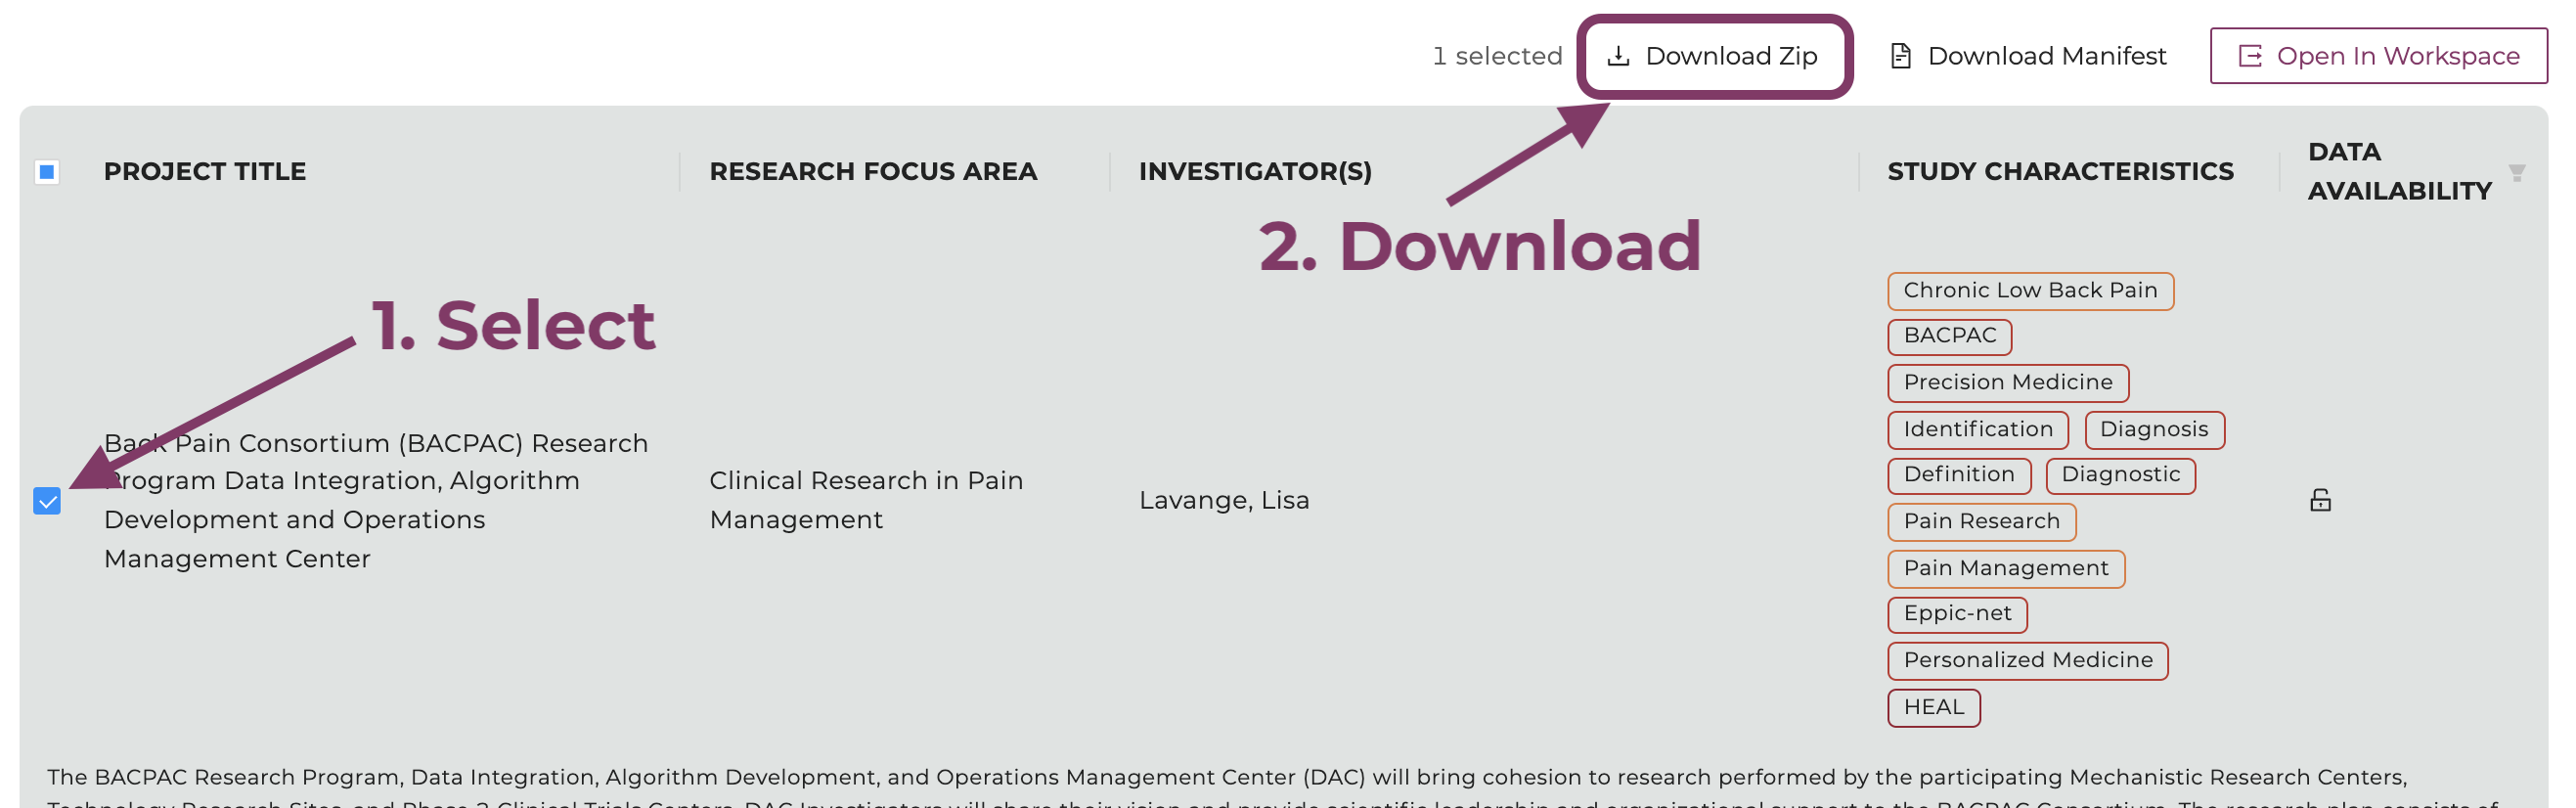
Select the study and click "Download ZIP".
-
Users will be prompted with a window that shows the download is being prepared.
Please do not navigate away from this page until the download is complete.
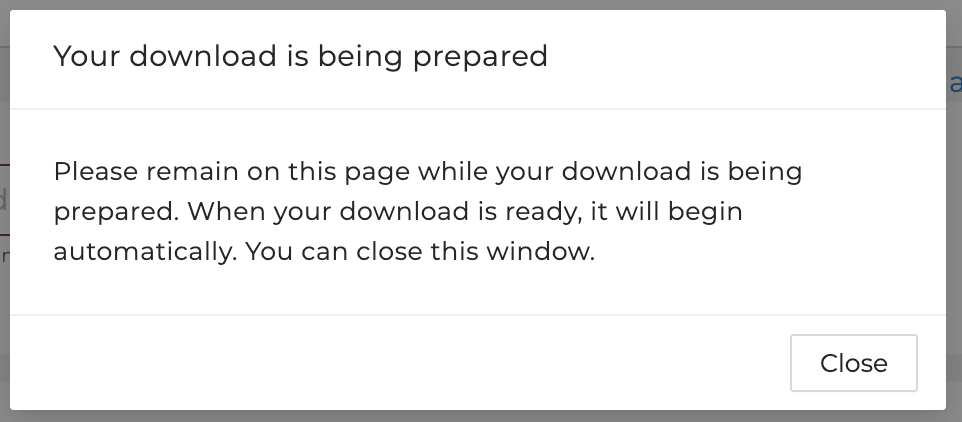
After clicking "Download ZIP", your download is being prepared. Please do not navigate away from this page until the download is complete.
-
Users will be notified once the download is ready. If the download doesn't start automatically, please follow the link prompted.
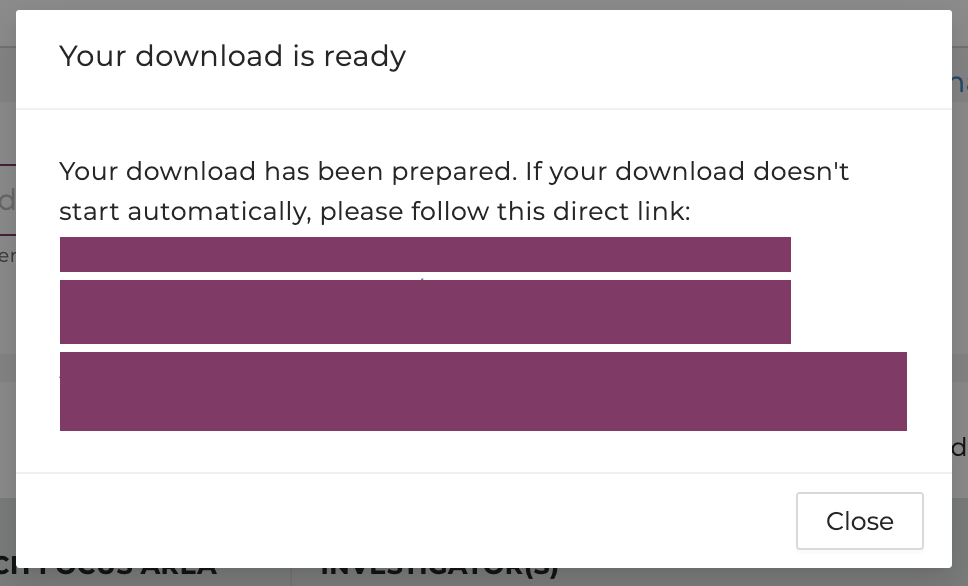
Users will be notified once the download is ready. Save the file(s) by selecting the directory using the prompted window.
-
If the file size exceeds 250 MB, users will be notified to deselect studies to reduce the size or use other tools:
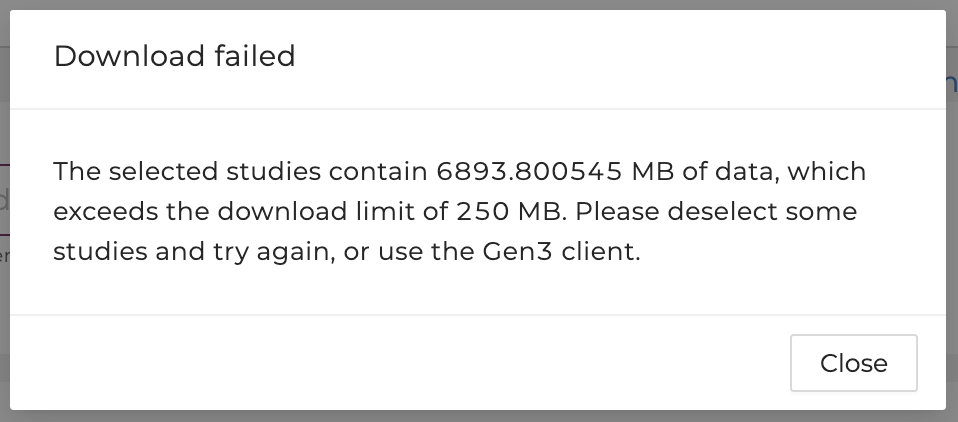
Users are advised to use other tools to download the files if the total file size exceeds 250 MB. Please see the next section for a step-by-step guide using these tools.
b) Download Data Files using the Gen3-client
In order to download data files above 250 MB, users will need to utilize the Gen3-client command line tool developed by the University of Chicago’s Center for Translational Data Science.
The current studies that have datasets of more than 250 MB are those with the following project numbers: a) cdcwonder and b) deaarcos1.
Find below a guide to download data files using the Gen3-client:
-
Log in to the HEAL Platform on healdata.org/login. Link your accounts to FAIR repositories as described here.
- Find and select one or multiple studies of interest on the Discovery Page. For multiple studies, select "Data Availability" in the top right corner, click “Available”, and choose multiple studies.
-
Click on the button “Download Manifest".
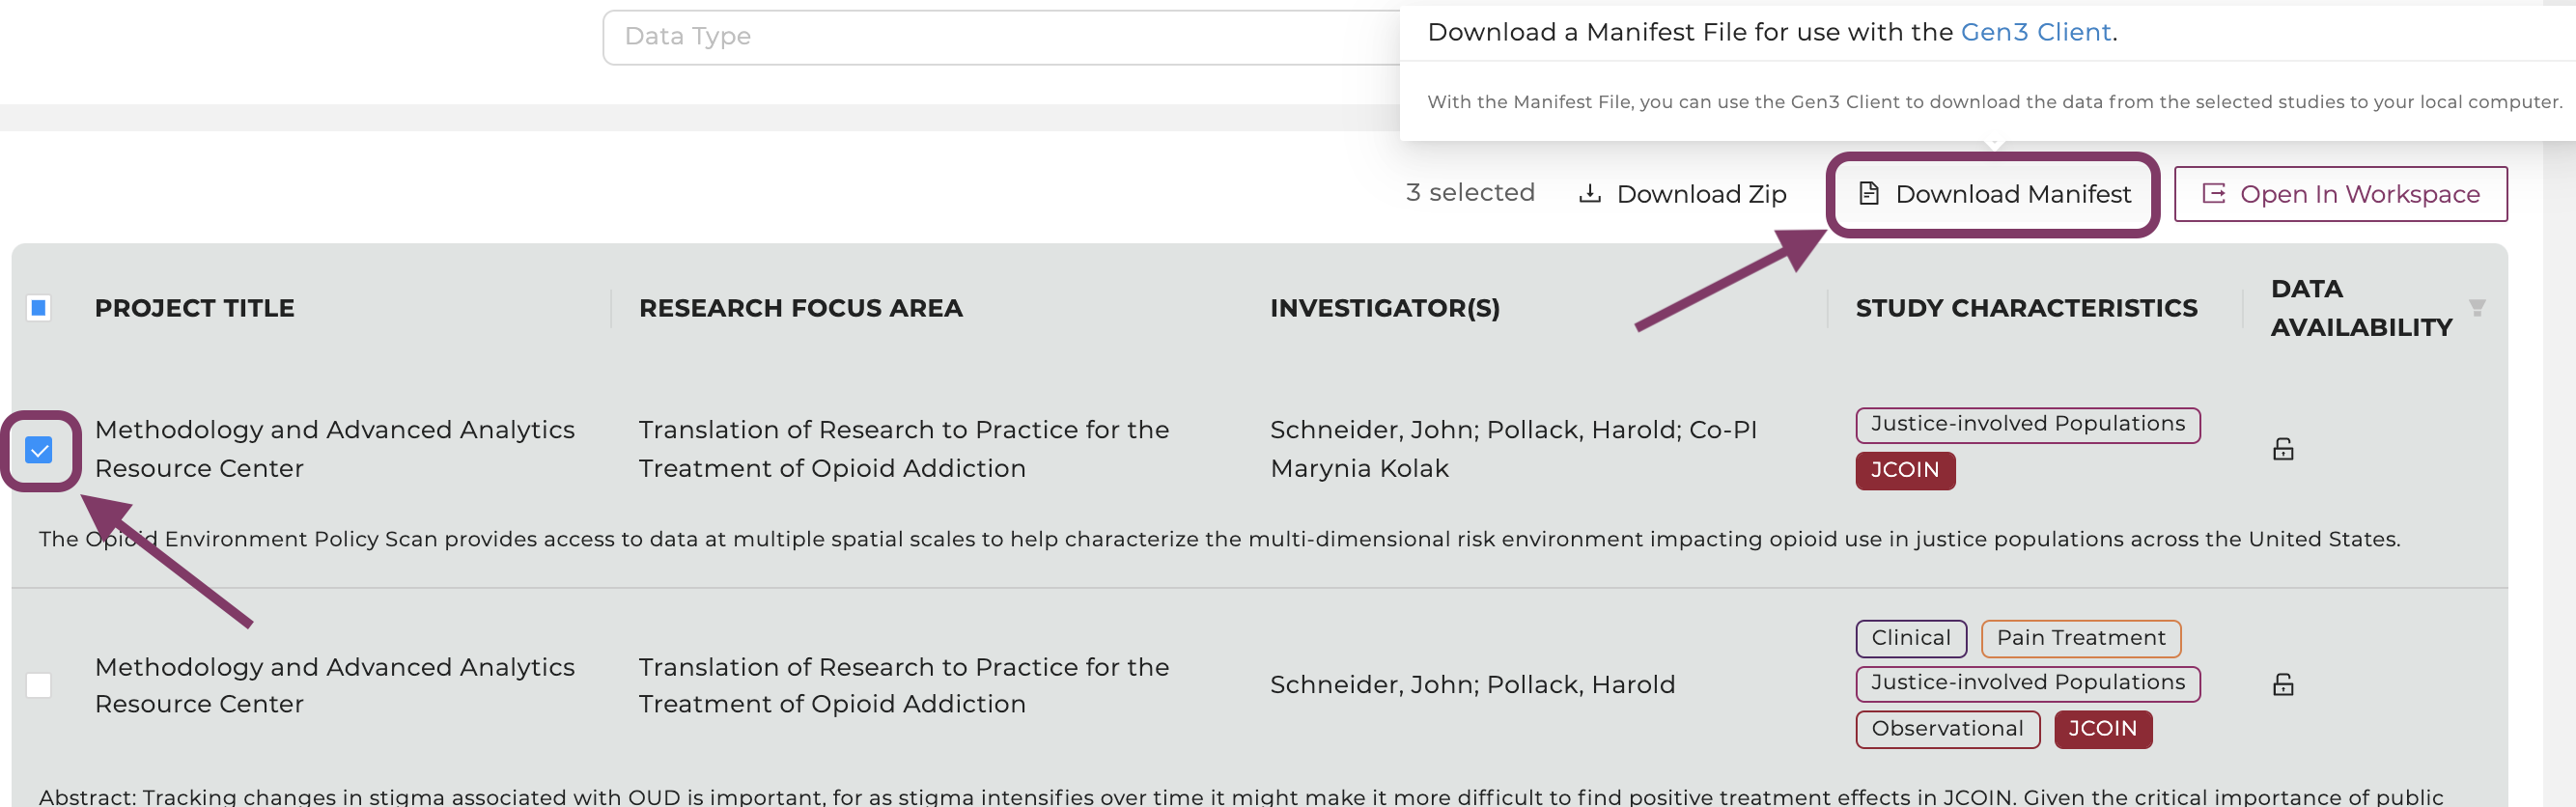
Select a study of interest, then click on the button “Download Manifest".
-
Create and download an API key from your Profile Page. Note where you save the API key on your local machine.

Create an API key on the profile page.
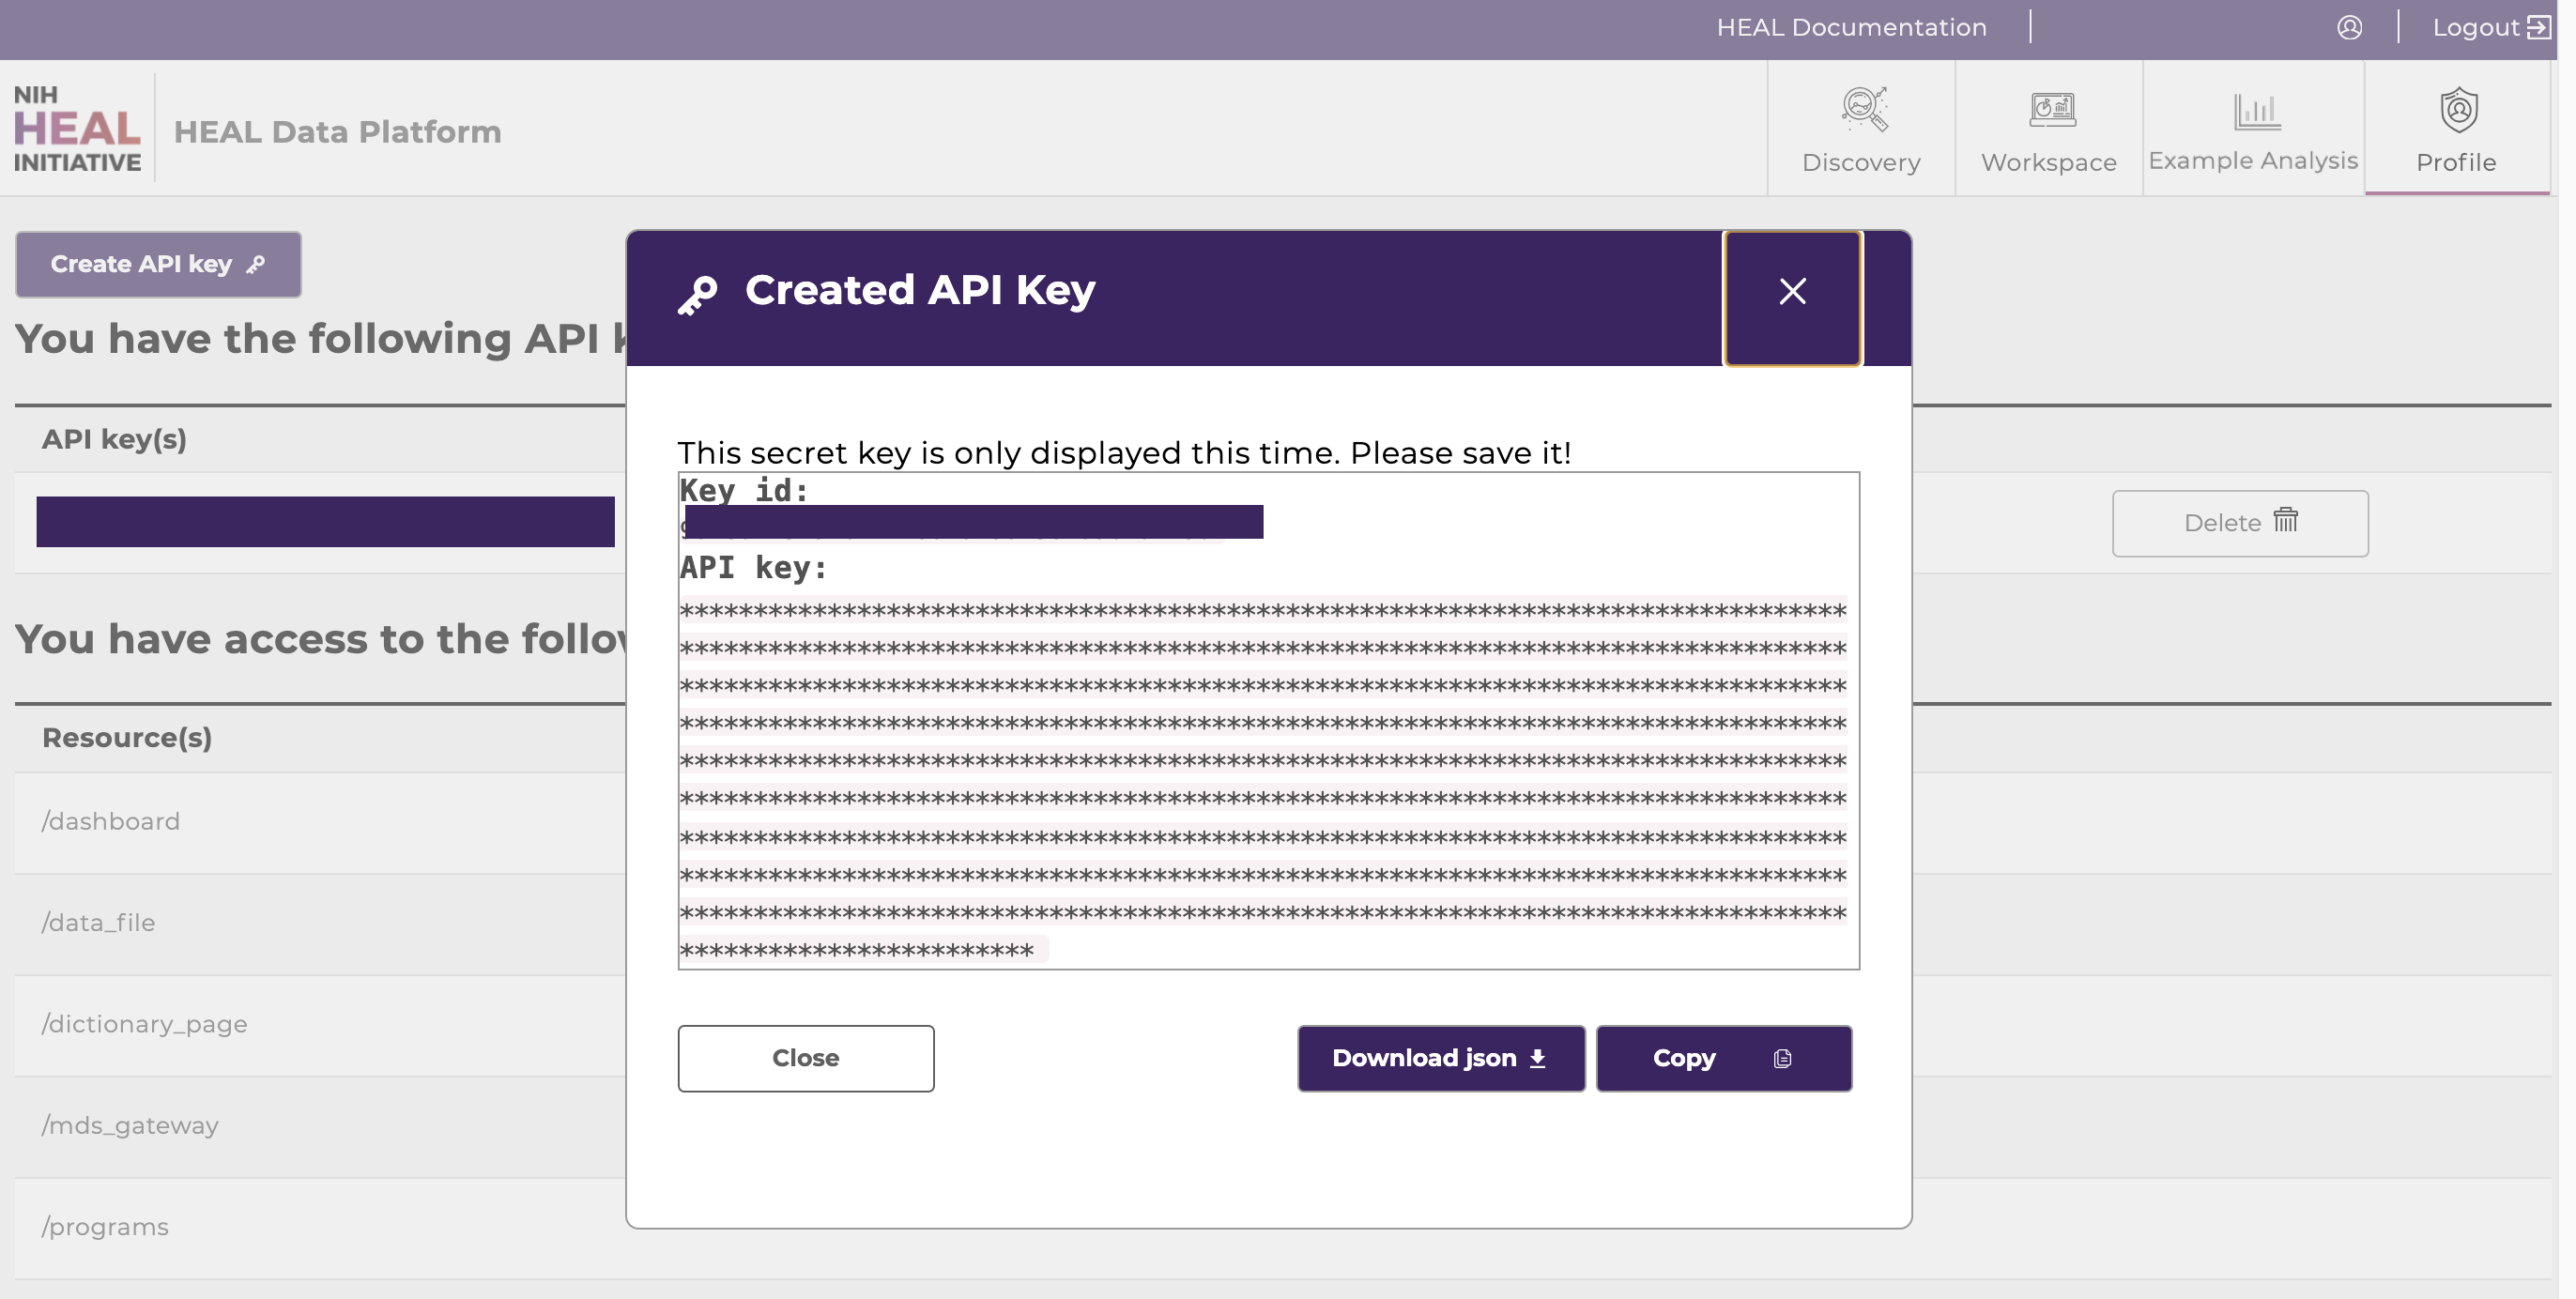
Download the API key as json file and note the directory where the API key was saved for step 6.
-
Download and configure the Gen3-client
a. Follow the download instructions of the Gen3-client here. The client can be downloaded here.
b. In your terminal, configure your profile using the following command:
                            gen3-client configure --profile=<profile_name> --cred=<credentials.json> --apiendpoint=<api_endpoint_url>


                                #Mac/Linux:

                                gen3-client configure --profile=demo

                                  --cred=~/Downloads/demo-credentials.json --apiendpoint=https://healdata.org/


                                #Windows:

                                gen3-client configure --profile=demo

                                  --cred=C:\Users\demo\Downloads\demo-credentials.json --apiendpoint=https://healdata.org/


                                #Output:

                                  10:08:20 Profile 'demo' has been configured successfully.
If successfully executed, a configuration file will be stored under the directory the user specified under “cred”. For troubleshooting, refer to the instructions found here.
c. Download files by using the following command, which references the manifest file name and its location:
                            gen3-client download-multiple --profile=<profile_name> --manifest=<manifest_file> --download-path=<path_for_files>


                                gen3-client download-multiple --profile=demo --manifest=manifest.json --download-path=downloads


                                #Output:


                                2021/06/03 16:48:46 Reading manifest...

                                 200 B / 200 B [===================] 100.00% 0s

                                WARNING: flag "rename" was set to false in "original" mode, duplicated files under "downloads/" will be overwritten

                                Proceed? [y/n]: y

                                2021/06/03 16:48:47 Total number of GUIDs: 1

                                2021/06/03 16:48:47 Preparing file info for each file, please wait...

                                 1 / 1 [============================================] 100.00% 0s

                                2021/06/03 16:48:47 File info prepared successfully

                                arcos_all_washpost.tsv.gz  6.41 GiB / 6.41 GiB [=======================================================]  100.00% 0s
c) Download Data Files in Workspaces using the Python SDK
Users can download data files to the workspaces by leveraging the CTDS-owned python software development kit (SDK). Follow instructions below.
-
Log in to the Data Commons on healdata.org/login. Link your accounts to FAIR repositories as described here.
-
Find and select one or multiple studies of interest on the Discovery Page. Select "Data Availability" in the top right corner and click on “Available” to see all available
studies.
-
Select a study and click on "Open in Workspace".
-
Select a workspace VM and click "Launch". Choose the "(Generic) Jupyter Notebook with R kernel" if you are familiar with setting up Python- or R-based Notebooks, or if you just exported one or multiple studies from the Discovery Page and want to start
your custom analysis. Choose a VM with the name of the Notebook if you selected the studies relevant to a specific Notebook and want to work on the Notebook in interactive mode.
Available workspaces on the HEAL Platform (top). Users need to link accounts from other repositories (bottom; click here to see how).
-
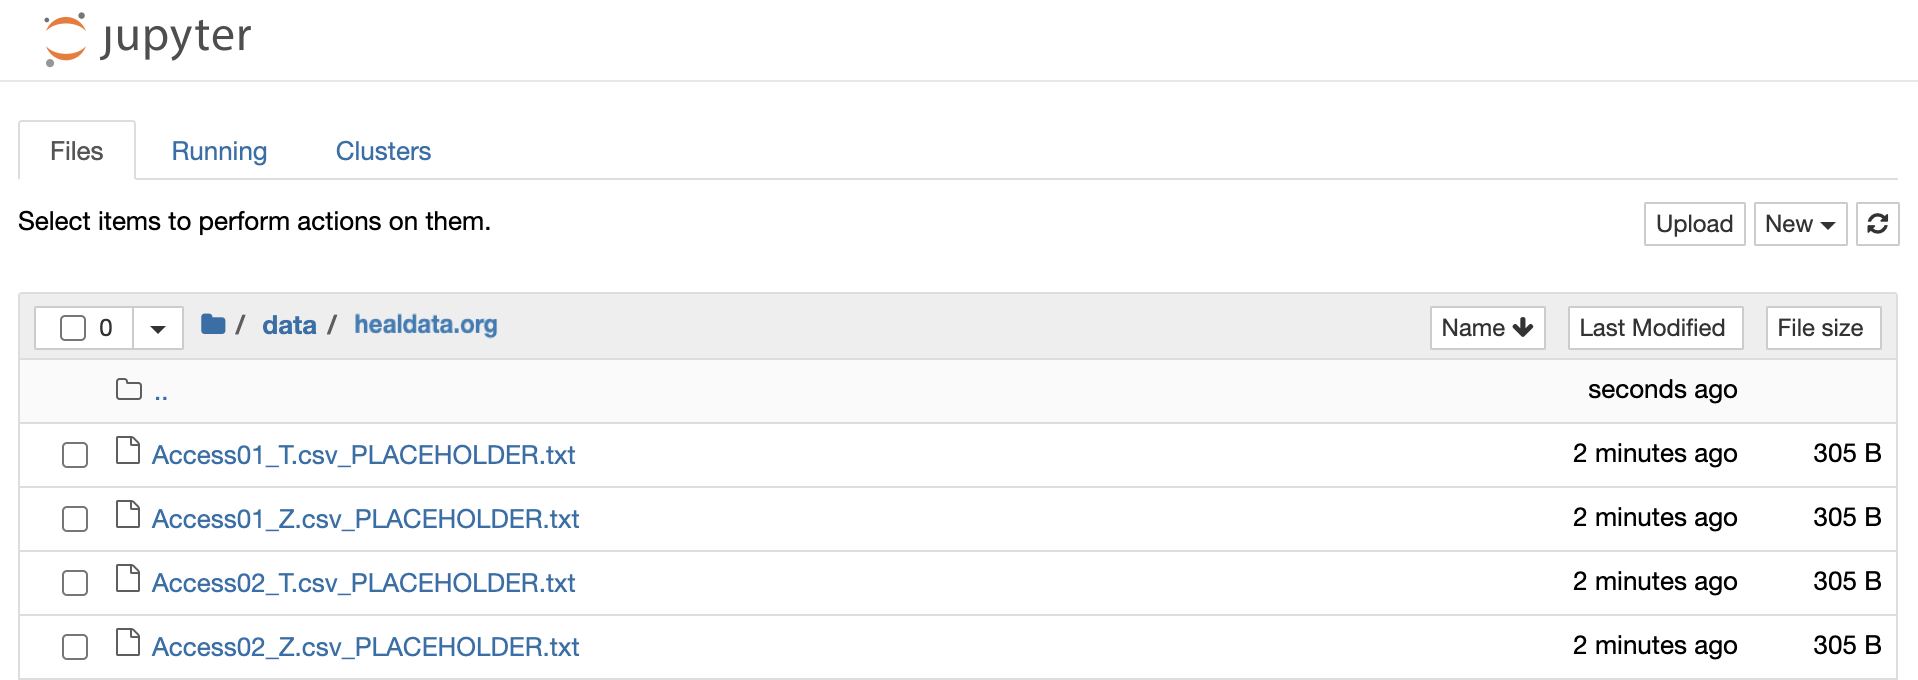
Find all files under /data/healdata.org/ with the ending "PLACEHOLDER". These files can be directly downloaded either in the terminal or in a notebook cell.
-
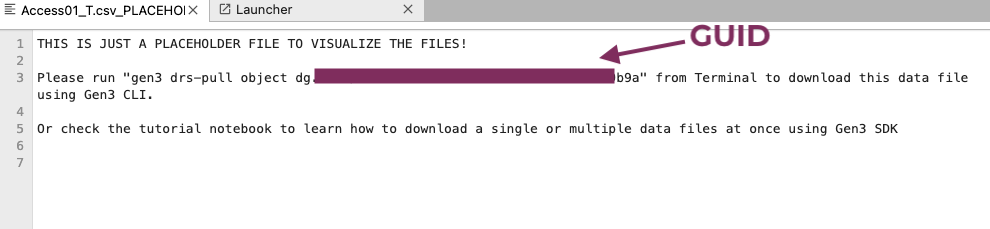
Click on one file and copy the command and GUID.
-
Open a new terminal under "New".

-
- Type in the following command to download the file to the terminal:
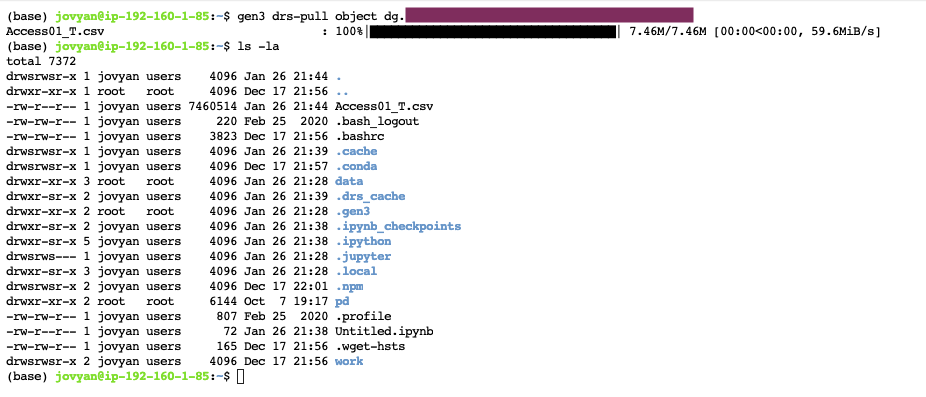
gen3 drs-pull object "guid"
-
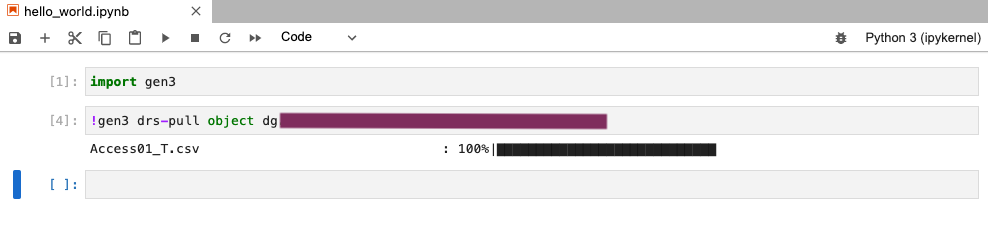
If you are working in a notebook, type in the following command into a code cell to download the file:
!gen3 drs-pull object "guid"
-
If you use the R kernel, change the command into
system("gen3 drs-pull object 'guid'")
-
Note, that you can also use the
manifest.json to download in batches, see below:
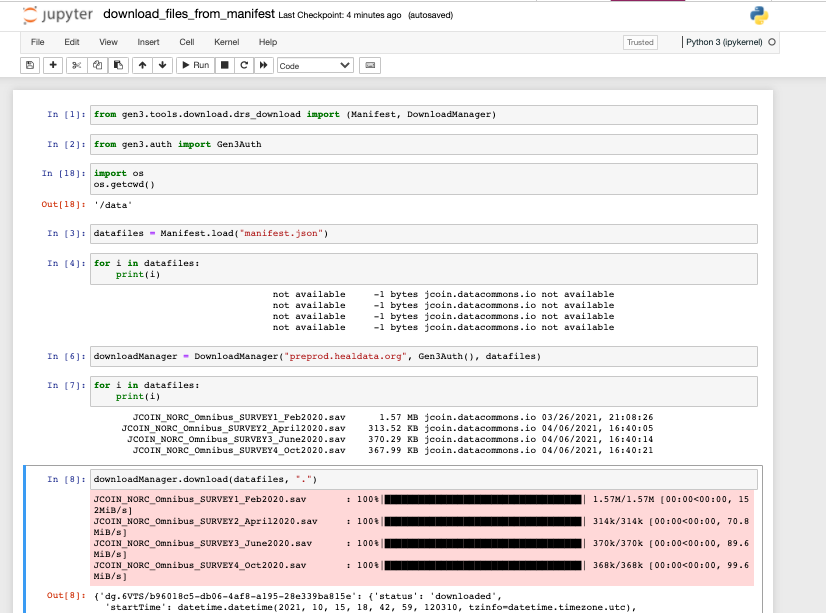
Download files in batches with a file manifest using the commands shown above.
- Type in the following command to download the file to the terminal:
-
The file(s) should be downloaded and is ready to be worked with in your Notebook.
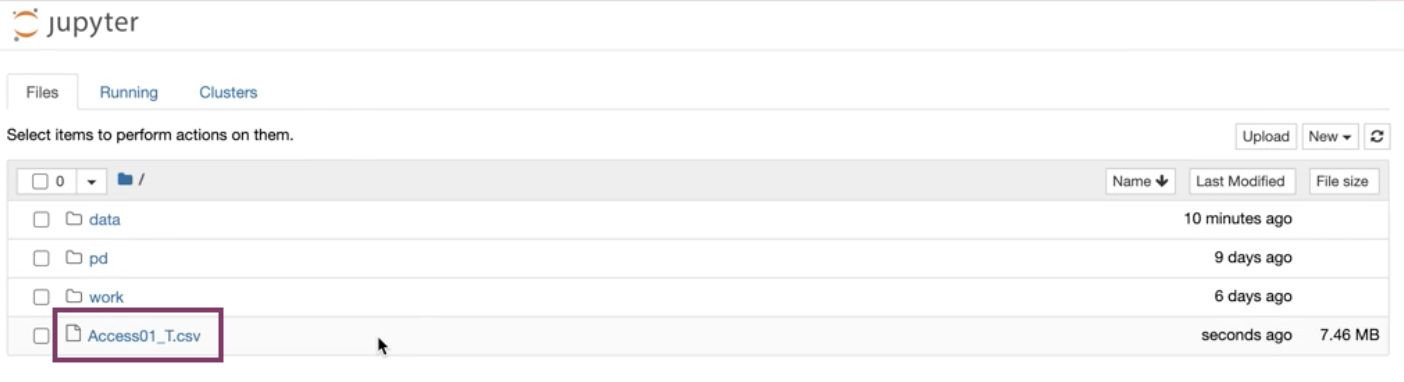
Downloaded files can be found in your home directory.
6. FAQ
-
What can I do on the HEAL Platform?
The HEAL Platform is a cloud-based and multifunctional web interface that provides a secure environment for discovery and analysis of HEAL results and data. Explore all functionalities here.
-
Which datasets are currently
open-access?
Find all open-access datasets here.
-
Where can I see individual study
metadata?
Individual study metadata is shown upon clicking on a study entry on the Discovery Page. Click to read the full description here.
-
How and where can I see if I have access to a
study?
Clicking on an individual study on the Discovery Page will show in the top right corner if they are accessible to the user. To see all studies users have access to, users should navigate to the Discovery Page and select “Data Availability” - Available”. More information here.
-
I do not have access to a specific study, how can I
get access?
RENCI/RTI (Renaissance Computing Institute) at the University of North Carolina at Chapel Hill establishes and manages data access contacts over all data contributors/sources. To request access to controlled data, users should contact RENCI/RTI at HEALstewards@renci.org.
-
The profile page says I have access but I don’t see
it on the Discovery Page.
Please contact our help desk.
-
Do I need to store my data in a particular
location, repository, or
database in to participate in the HEAL platform?
You must store your data in a HEAL-approved repository. A HEAL-approved repository is a data repository that is NIH-approved AND positively has an API for metadata, data, and data permissions calls.
-
How do I find a HEAL-approved repository in which
to store my data?
Please reach out to RENCI for further questions on this topic.
-
Are there costs that will be the responsibility of
individual investigators associated with data storage in a HEAL-approved
repository now and in the future?
Please reach out to RENCI for further questions on this topic.
-
I would like to download data files from a specific
study, what do I need to do?
Users can download the studies directly from the Discovery Page as described here, or, if the file size exceeds 250 MB, users need to use the Gen3-client command line tool to download data files, as described here. Additional information on the Gen3-client may be found here.
-
How can I get data files into the Workspace from
the Discovery Page?
Click here to follow the steps on how to get files from the Discovery Page to the Workspace.
-
How do I find a study?
Click here to see possible ways to search for a study on the Discovery Page.
-
Can I download files directly from the portal?
Yes, you can. Click here to follow the steps to download data files from the Discovery Page. Caution: the download is limited to file sizes of 250 MB.
-
My download is not working.
Please check if your file size exceeds 250 MB. If yes, please other tools as described here to download the files. Note that the current studies that have datasets of more than 250 MB are those with the following project numbers: a) cdcwonder and b) deaarcos1. If errors persist, please contact the help desk.
-
My data file download using the Gen3-client gets
stuck, where can I get help?
For troubleshooting, please see the Gen3-client documentation here. If errors persist, contact our help desk.
-
The Gen3-client shows errors, where can I get help?
To check that the client is working and to confirm the client version, type ‘gen3-client’ in the terminal. Typing ‘gen3-client help’ will display the help menu. Users must provide the full path of the tool in order for the commands to run, for example, ‘./gen3-client’ while working from the directory containing the client.
For more troubleshooting, please see the Gen3-client documentation here. If errors persist, contact our help desk.
-
I want to work interactively on the Tutorial
Notebooks. Show me how.
Click here to follow the steps of a demo.
-
What are the current Tutorial
Notebooks?
Click here to see a list of currently available Notebooks in Python and R.
-
How do I work with these Tutorial
Notebooks?
Click here to see a guide of how to work with the Tutorial Notebooks.
-
How do I link my account to a FAIR enabled
repository?
Click here to see how to link your account to a FAIR enabled repository.
-
What do the Workspaces have to
offer?
Click here to see how to get started and here to see what languages, tools, and environments the workspaces have enabled.
-
I want to report a bug!
Please report any errors or bugs to our help desk.
7. Tutorial Videos
Watch our tutorial videos to learn how to interact with the HEAL Platform, export data files from the Discovery Page, and use the tutorial Jupyter Notebooks as a launching point for your own custom analysis.
-
“HEAL Platform Tutorial”
Watch this video to start learning about all features on the HEAL Platform.
If your Browser does not support watching this video, here's a link to the video instead.
-
“The Opioid Environment Toolkit and OEPS”
This tutorial video demonstrates the use of the HEAL Platform Workspace through the analysis for the Opioid Environment Policy Scan Dataset using statistical tools written in the R programming language.
If your Browser does not support watching this video, here's a link to the video instead.
-
“Opioid Overdose Trajectories”
This tutorial video demonstrates the use of the HEAL Platform to reproduce findings of a CDC study of Opioid Overdose Death rates in the United States.
If your Browser does not support watching this video, here's a link to the video instead.
-
“HEAL Example Analysis”
This video introduces users to the Example Analysis page, where users can browse Jupyter notebook demos to explore previous data analyses on the HEAL platform.
If your Browser does not support watching this video, here's a link to the video instead.
Contact
Need help? Please contact our help desk.
Powered by